Slave to the Game
Online Gaming Community
ALL WORLD WARS
LUFTWAFFE GUNNERY PRIMER: AERIAL FIXED WEAPONS
(D.(Luft) 5000/1 Ziel- und Schießregeln: Starre Bordwaffen, 1944)
I. Introduction
D. (Luft) 5000/1 Aerial Gunnery Primer provides fighter pilots with heavily illustrated methods and techniques of aerial gunnery.
Only the most valuable and proven methods and techniques will be discussed.
Copies of D. (Luft) 5000/1 are to be distributed to all pilots of fighter units.
Suggested changes are to be forwarded to the attention of the Chief of the Training at the Luftwaffe Gunnery School.
II. Gunnery Methods
A. General
It's true that your actions will decide the outcome of an aerial combat, however it would be a great mistake to believe that your instincts alone will enable you to shoot accurately when you meet the enemy.
Your aircraft is your weapon. You must thoroughly master its capabilities.
Not only your ability to fly airplane and exercise the right tactical action are important for your success, but also your ability to master the gunnery principles and methods.
In the thick of an air combat, you will not have a time to waste.
Act instantly!
That requires practice, practice, practice!
You have been provided with the best guns and ammunition, your only task is to use them to destroy your enemy.
Ignore the so-called "naturals" who reject any discussions of gunnery as 'dry theory'.
We will not burden you with endless calculations and formulas, instead we give a summary of practical examples based on experience gained by your comrades from many hard-won air battles.
It would be unwise to let you start from scratch and be allowed to repeat the same mistakes all over again.
Learn from the experiences of your comrades, both dead and alive.
Practice as often as you can, only practice develops skills and success. Without skills a person may have a luck once, but the long and successful career is impossible without skills.
B. Guns and Ammo
You will fire your guns. For that purpose you will need to know your guns and ammo.
You don't have to understand the purpose of every screw, or to remember all parts of your weapons.
However, you must to understand its basic assembly, operational cycles, and limitations of use.
On top of that you must know your ammunition and the length of fire for each weapon.
Guns manual will help you to learn about specifications of your weapons.
Master your weapons. Too many pilots managed to maneuver in excellent firing position, but were unable to shoot because they forget that safety switch was still in "On" position.
Know how to load your guns. When they are loaded, the appropriate mechanical or electrical indicators will show that the guns are ready to fire.
Make sure the your counters are set correctly; otherwise, in the midst of combat, you will be uncertain how many rounds of ammo left.
Check the correct loading of your ammo and know how to position your ammunition belts properly.
When you know how to do it yourself, in case of emergency landing, where no armourers are available, you will be able to load your ammo yourself.
Before engaging the enemy, make sure that safety switch on your weapons is off and check the ammo indicators and round counters.
You must fire your weapons at the ranges for which they were designed. Usually you should not fire at ranges greater than 400 m, since on the larger distance the bullets or shells trajectory will turn downwards before reaching the target. This also applies tо heavy weapons, for example, MK 108.
It is a common mistake to believe that the larger caliber of your weapon, the greater range bullet or shell will travel, and aiming of heavier weapons has not be as precise as aiming of weapons of smaller caliber.
Precisely opposite is the case!
Since your ammo is limited, you must use it sparingly and fire only when you have a reasonable chance to hit your target.
The shorter the range, the more hits your target will get.
In fact, chances to hit your target with 30-mm weapon is the same as with a gun of smaller caliber!
Accordingly, you must take accurate aim and fire your weapons, no matter what their caliber is.
Even more, in case of heavier guns, you have to shoot more accurately because you have less ammo available.
If you have a weapon of small caliber with 1000 rounds available, the burst of 50 rounds, missing a target, doesn't mean much.
However, if you are using, say, MK 108, with only 60 rounds available, you cannot afford to waste 50 rounds, which is almost all ammo available to you, without obtaining any results.
Come closer!
Aim carefully!
Fire accurately!
By closing on the enemy to the minimum range you will make the enemy gunner so surprised and nervous that he may even forget to open fire and you will be victorious.
Remember:
Start firing only at a range of 400 m.
The obvious exception is a frontal attack on the enemy's bomber when you must start firing at the range of 800 m.
When target is in your gun sight, fire short bursts only, or your ammo will be expanded too soon.
Make sure that you know what maintenance procedures your guns require. Help your armourer with gun servicing an ammo loading! In that case you will be certain that your guns will work properly.
С. Gun sight
Your aircraft is equipped with a reflector gun sight.
With precision lens system, deflection circle and sighting cross are projected onto a tilted glass plate so they always superimpose on the target.
Benefits of these gun sight are many:
You can see your sight and a target in focus at the same time.
You can move your head slightly from side to side or forward and back without loosing the line of sight.
You can see sight and a target with both eyes open. Field of vision is large and, depth perception can be maintained.
The intensity of the sight is adjustable. This is very useful, since in bright sunny weather the sight have to be brighter than in the dark twilight.
To see your sight clear, adjust the brightness!
If sight is too bright it can obscure the target.
Before the takeoff make sure that the gun sight lamp works, its too late for that when you are in the air!
Your armourer is responsible for gun sight adjustment.
You can help him with adjustments, practicing at the same time how to do it properly yourself.
If the gun sight is off, don't blame your armourer, instead check if there were other reasons:.
Was your landing hard?
Did you accidentally touched gun sight when you entered or left the aircraft?
Did you shake the gun sight, accidentally loosing off the adjustment screw?
Any of these reasons could offset the adjustments.
D. Combat ranges
To destroy your opponent, you must approach sufficiently close to him to use your weapons with full effect. The closer you are, the more hits you can obtain. If you approached to the half of the range, you increase the number of your hits four times.
If you know how to close in, you already won half of the victory.
According experience, combat ranges are regularly underestimated. The distances indicated in after-action reports are always much smaller. For example, when a combat range of 50-100 m is indicated, in reality it may vary between 200 m and 400 m, as shown by analysis of combat films. Often errors in range estimation are even greater.
During attacks on four-engine bomber formations many fighters have opened fire at 2500-3000 m.
This is a plain wastage of ammunition!
At the ranges like this it is impossible to hit anything.
If you wasted your ammunition without any sense, then you may be out of ammo in the critical moment of action when you approached sufficiently close to the enemy.
Remember:
You must estimate the combat range correctly!
This is not as difficult as it may appear.
The combat range can be estimated easily with the aid of two tools available to you:
1. Gun sight deflection circle;
2. Enemy's wing span.
When you look through the gun sight, the deflection circle will always be superimposed on the target. This circle designed in the way, that the distance measured by its diameter is equal to one-tenth of the range to the target.
At 100 m combat range the diameter is 10 m;
at 200 m combat range the diameter is 20 m;
at 400 m combat range the diameter is 40 m;
at 1000 m combat range the diameter is 100 m.
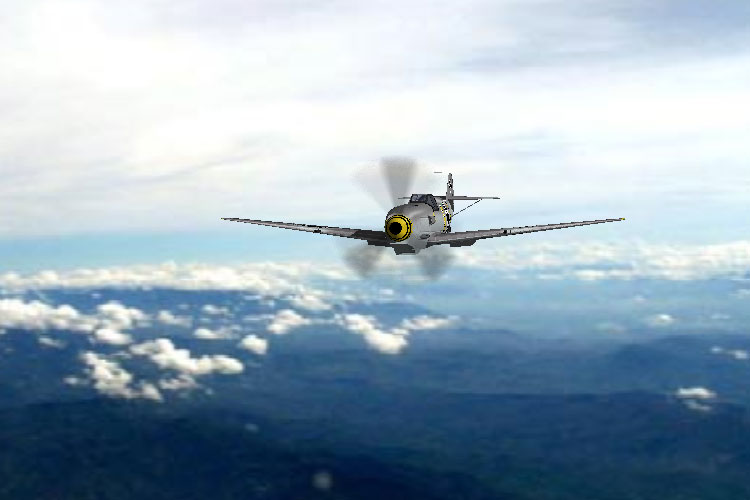
A fighter has a wing span of 10m. If, therefore, you see a fighter fits within the deflection circle, it's located at 100 m from you.
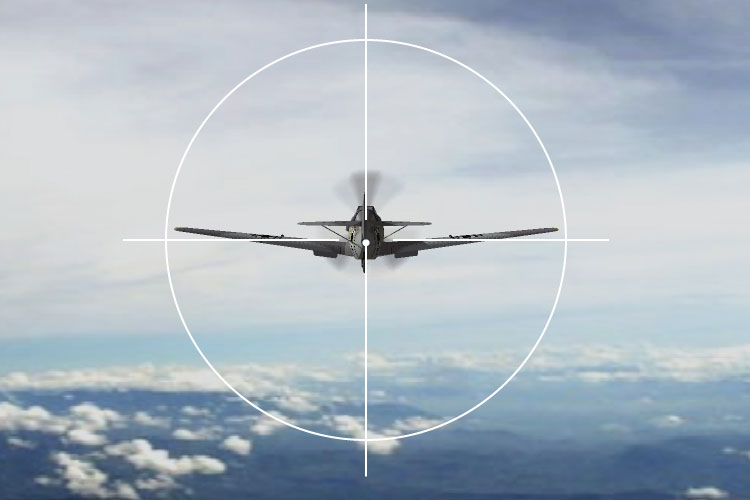
Fig. 1. Fighter. Range 100 m
A twin-engine bomber has a wing span of about 20 m. If it just fits within the deflection circle, it's at a range of 200 m.
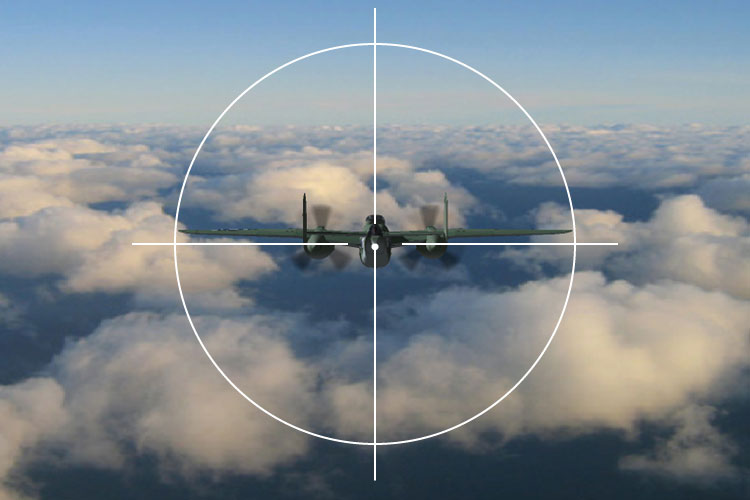
Fig. 2. 2-eng. bomber. Range 200 m
A four-engine bomber has a wing span of about 30 m. If it fits within diameter of the deflection circle, it is at 300m range.
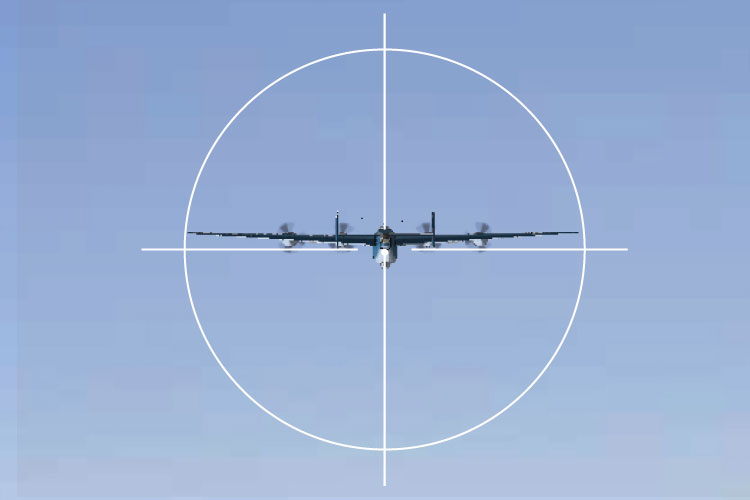
Fig. 3: 4-eng. bomber. Range 300 m
For range estimation use the following wing span numbers:
Fighter: 10 m;
2-eng. bomber: 20 m;
4-eng. bomber: 30 m.
For example, if Boeing В-17 with 31.6 m wing span fits in the deflection circle, it's located at a range of 316 m. However, for accurate firing 16 meters difference is not important.
At a range 100 m fighter's wing span equals to the diameter of the deflection circle. If the range increases, fighter will appear smaller in size. If it's wing span equals the half the deflection circle diameter, then distance to the fighter is about 200 m.
If it fits into the deflection circle four times, the range is 400 m.
If it fits into the circle six times, the range is 600 m, etc.
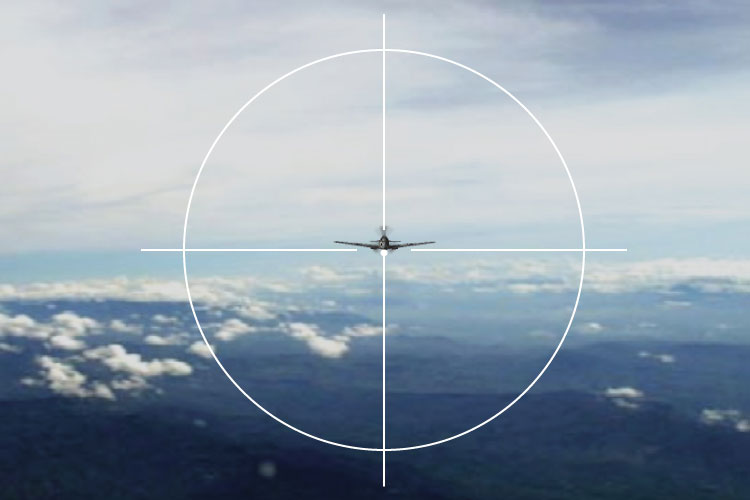
Fig. 4: Fighter. Combat range 400m
If 2-engine bomber fits into the deflection circle, range is 200 m.
If 2-engine bomber fits into the circle two times, range is 400 m.
If it fits into the circle four times, range is 800 m.
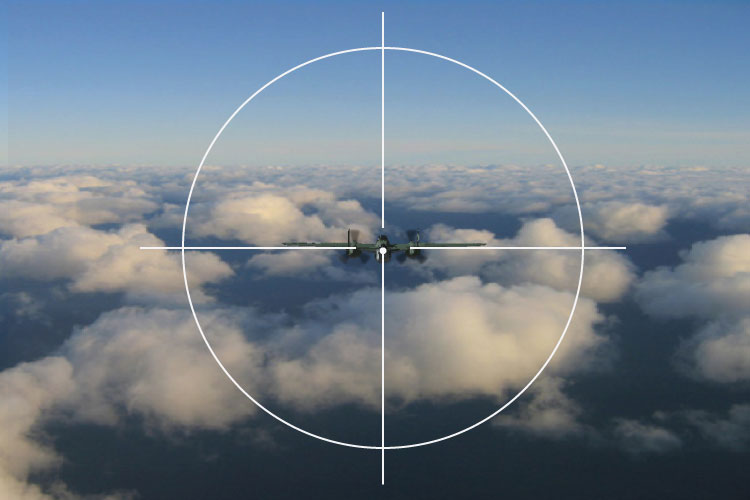
Fig. 5. 2-engine bomber. Range 400m
At 100m range 2-engine bomber is twice the diameter of the deflection circle.
The same calculations are applicable for 4-engine bomber.
If it's wing span fits equals diameter of the circle, the range is 300 m.
If it fits into the circle 2 times, the range is 600 m.
If it fits into the circle 4 times, the range is 1200 m.
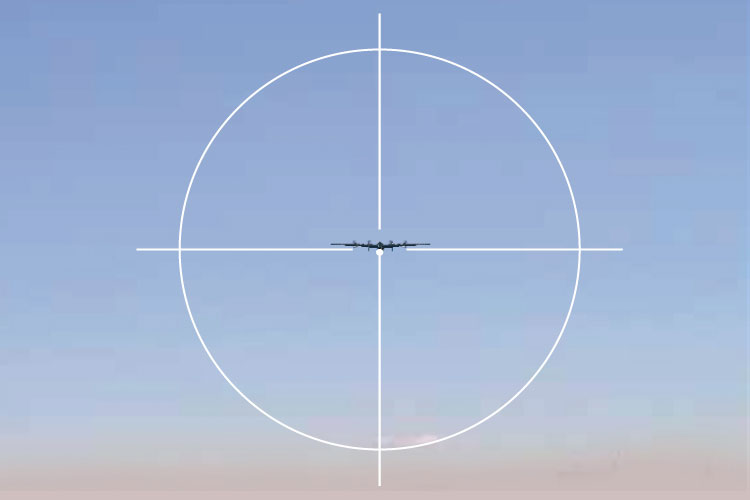
Fig. 6: 4-engine bomber. Range 1200 m
This is easy to learn.
You need only to estimate how many times wingspan of your target fits into the deflection circle.
If you are approaching a fighter with 10 meters span, the estimated rage is 100 meters.
Then:
Fighter (10m span)
fits in the circle 1 time = range 100 meters
fits in the circle 2 times = range 200 meters
fits in the circle 4 times = range 400 meters
For a 2-engine bomber the estimated range is 20 m span multiplied by 2.
Then:
2-engine bomber (20 m span)
fits in the circle 1 time = range 200 meters
fits in the circle 2 times = range 400 meters
fits in the circle 4 times = range 800 meters
For a 2-engine bomber the estimated range is 30 m span multiplied by 3.
Then:
4-engine bomber (30m span)
fits in the circle 1 time = range 300 meters
fits in the circle 2 times = range 600 meters
fits in the circle 3 times = range 900 meters
Learn and practice range estimation at every opportunity and during actual combat you will no longer make errors. On the illustrations everything seems obvious. However, because of the distance perception and other factors, the range will appear be much less than in reality.
Practice in estimation how your target fits into the deflection circle. Then multiply this by either 1, 2 or 3, depending on the target's wing span.
Only then you will be able to calculate the correct combat range.
Remember:
Almost everyone fires too far away from the target!
That means:
Ammunition wasted!
Low hits probability!
Surprise is lost, enemy who is alerted and has ample time to take defensive measures!
Result: No victory!
Save your ammunition for the decisive moment. Never fire from the distance more than 400 m, except head-on attacks on 4-engine bombers, in that case open fire at 800 m range.
E. Deflection
When you open fire on your target, bullets will need some time to reach it. In that time target will travel a certain distance. In order to hit the target you have to aim in front of the target and along the direction of target's flight.
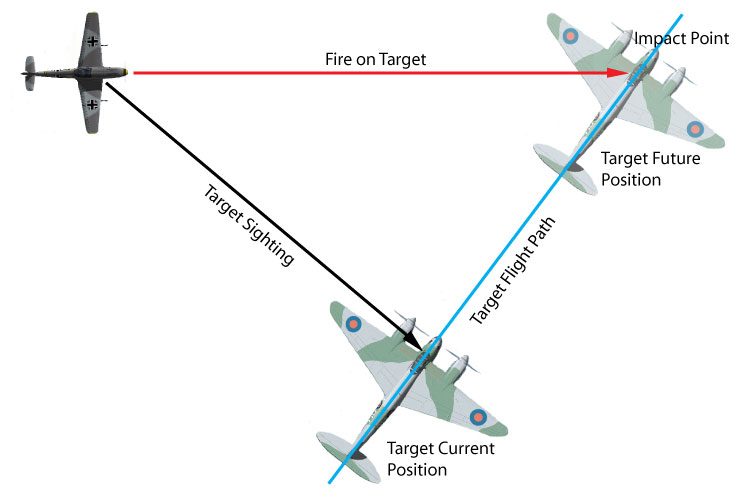
Fig. 7: Deflection
The faster the target moves, the greater your deflection has to be.
That's how you aim at a moving car:
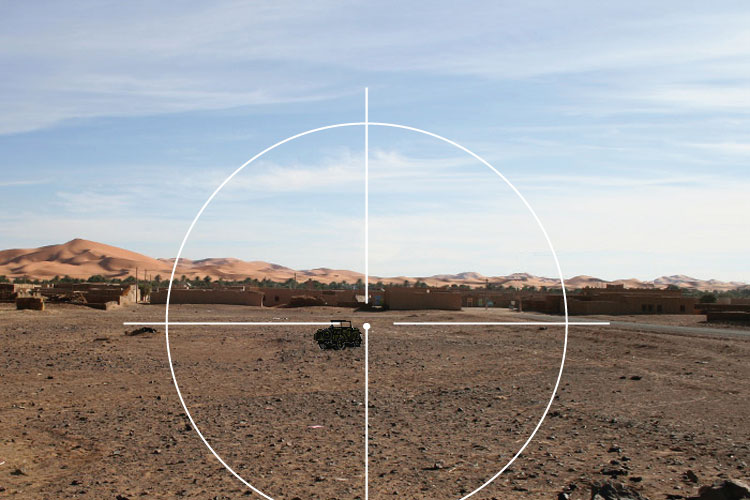
Fig. 8: Deflection on moving car
Aim at the aircraft as shown below:
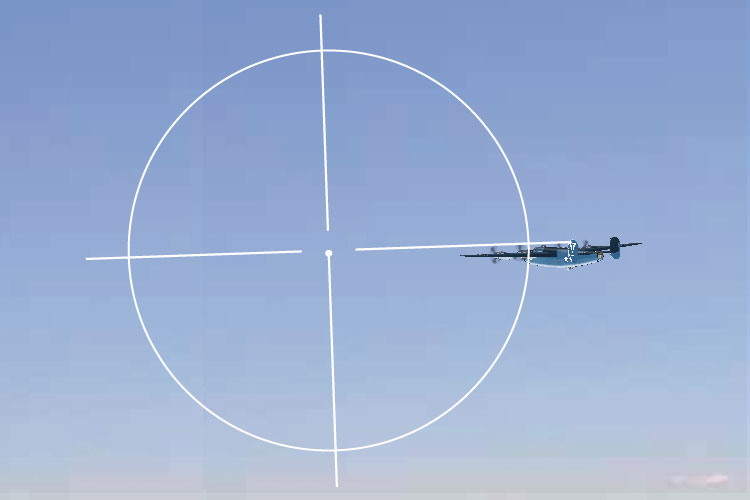
Fig. 9: Deflection on aircraft
The measure for deflection is the semi-diameter, or radius (R), of the deflection circle.
If you attack the enemy from directly behind or in front, you need no deflection. The aiming point is placed directly on the target.
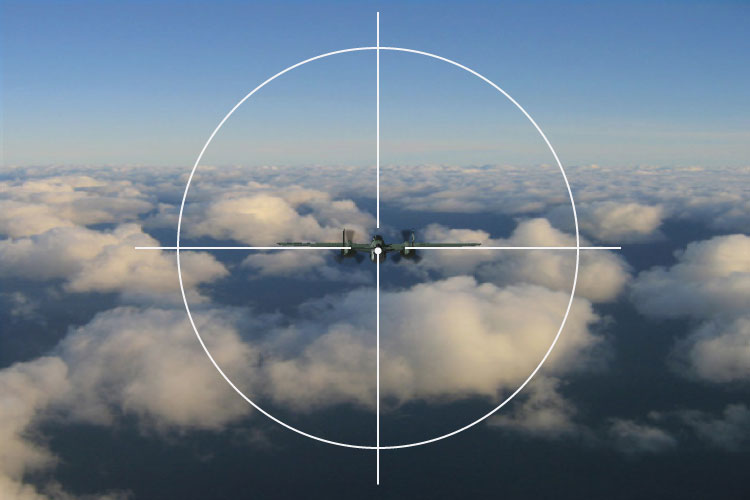
Fig. 10: No deflection
The larger difference between your direction of movement and your enemy, the larger must be deflection.
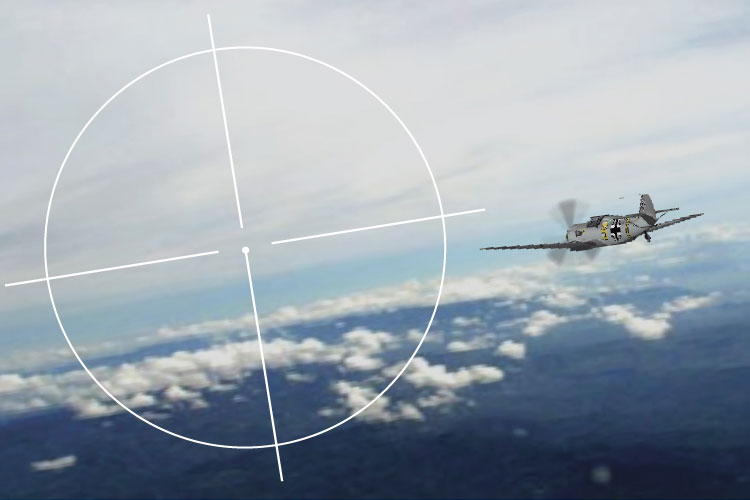
Fig. 11: Medium deflection
If you attack from the side, deflection will be at its maximum.
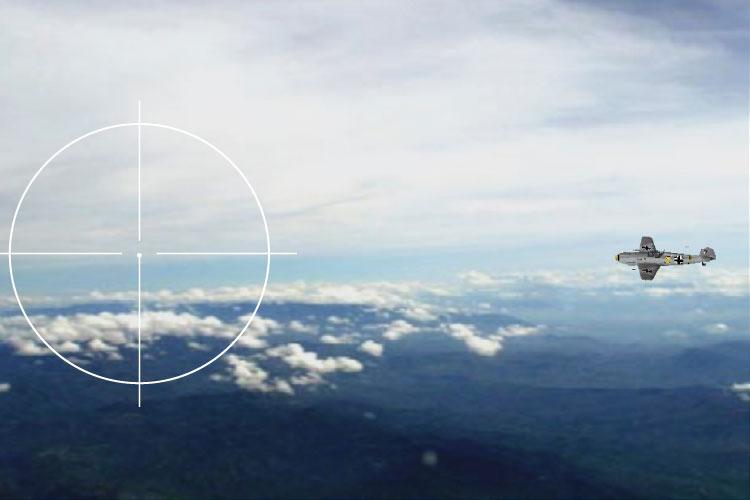
Fig. 12: Maximum deflection
In general, taking into account the air speed of the modern aircraft maximum deflection is 4R.
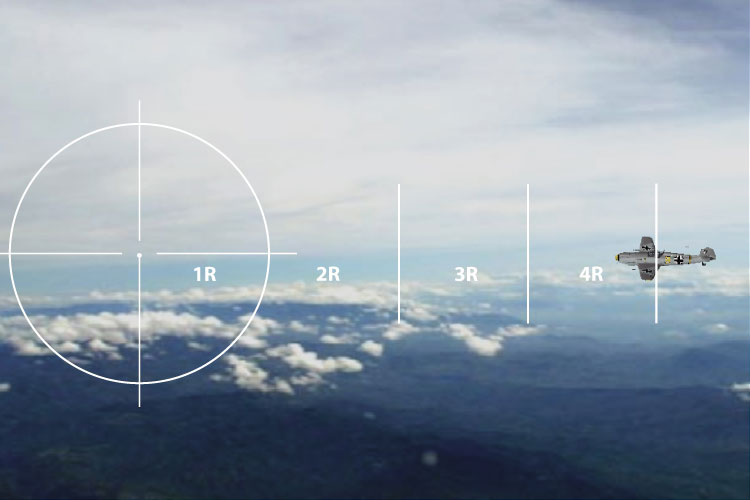
Fig. 13: Deflection 4R
Estimate the deflection with regard to the position of the enemy aircraft. The following examples will give you an idea of the necessary deflection for various aircraft positions.
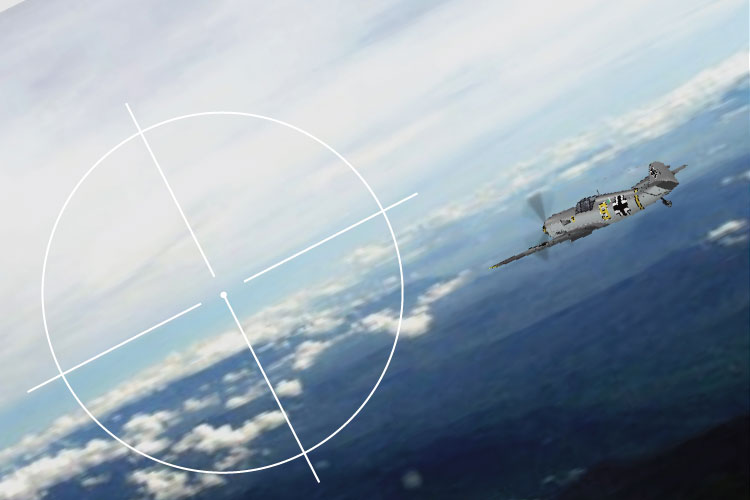
Fig. 14: Deflection 2R
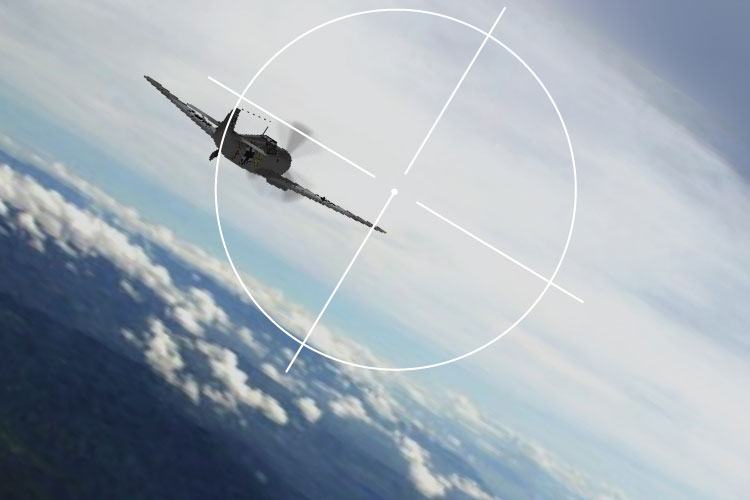
Fig. 15: Deflection 3/4R

Fig. 16: Deflection 1R
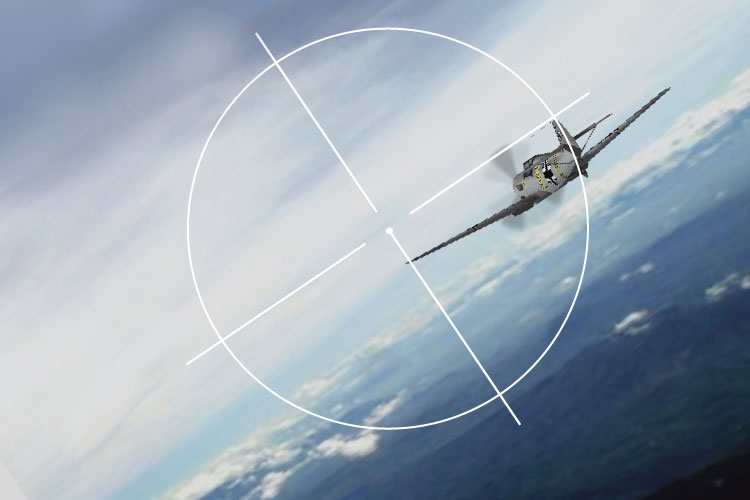
Fig. 17: Deflection 3/4R
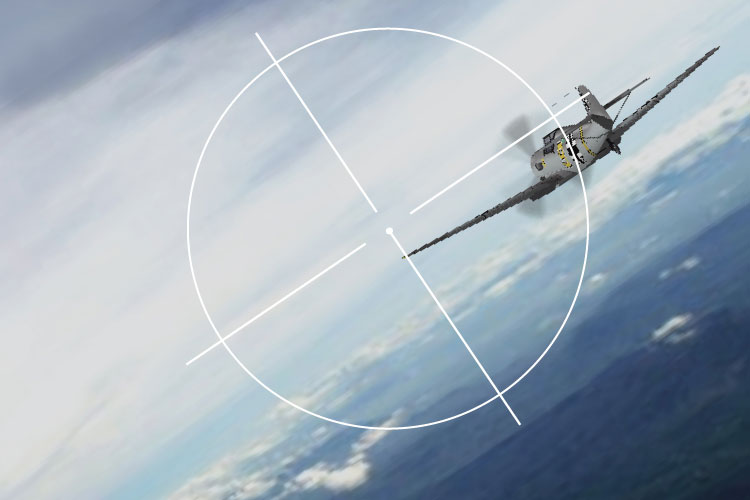
Fig. 18: Deflection 1R

Fig. 19: Deflection 1/4R
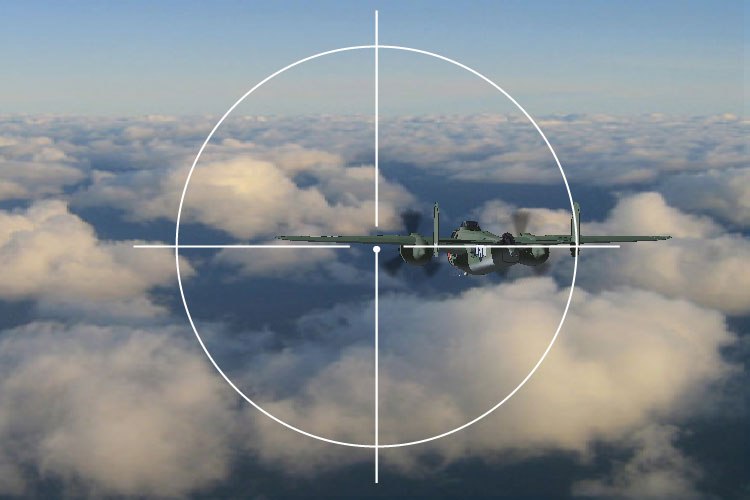
Fig. 20: Deflection 1/2R
It is not enough to learn deflection only for one position.
You must apply the deflection instinctively to every situation in which you find the enemy in front of you — estimating it and laying it off immediately and correctly.
That means constant practice!
Use training aids. They indicate deflection for each position.
Practice as often as you can.
It's never enough!
It is not good enough to calculate only deflection. Make sure that deflection is applied in the right direction.
The line of target flight must always pass through the center of the deflection circle!
Not like this:
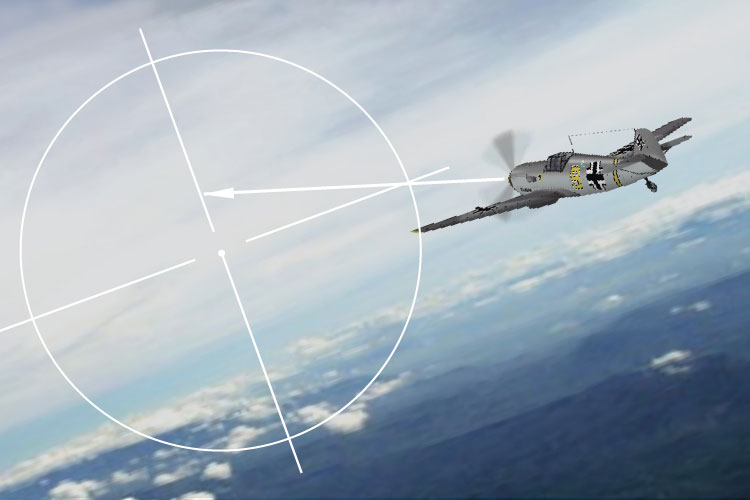
Fig. 21: Deflection doesn't correspond with the line of flight
but like this:
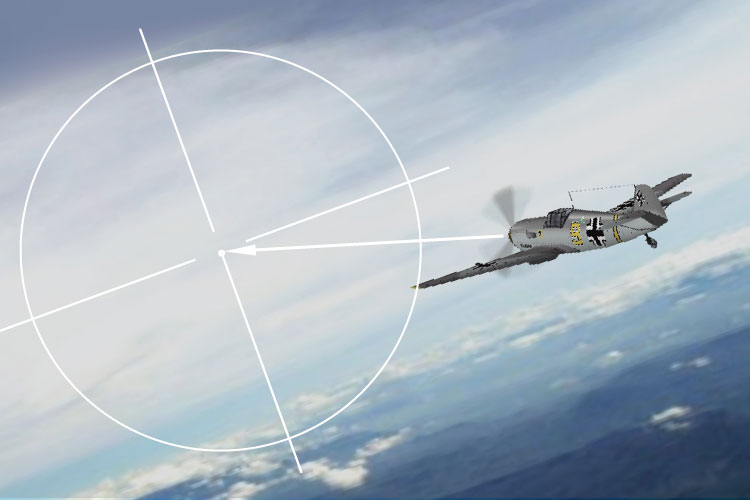
Fig. 22: Deflection correspond correctly with the line of flight
Sometimes it is difficult to estimate correctly the line of flight. Fighters in level flight will appear to be descending (flying nose down). You may fire too low.
Bombers in horizontal flight, especially if they carry bomb load, appear to be climbing (flying nose up). You may fire too high.
Always check carefully the enemy's line of flight.
The correct deflection is useless if you fire too low or too high.
Normally the estimated deflection is shorter than necessary.
If you not sure, increase, not decrease deflection since you can decrease it more easily than increase, just loosing off the airplane controls.
However, if you wish to increase your deflection, especially during a sharp turn, you have to increase your rate of turn. Often that is not possible because decrease of your air speed in tight turn might cause your aircraft to stall.
Also you might easily black out, and not be able to fire.
The correct estimation of necessary deflection is a victory, half won!
III. Air Combat
Place, where you are fighting, won't affect the application of your gunnery methods and techniques. The principles of gunnery are universal.
You must learn gunnery and improve it through constant training. They are as important as flying and tactical training.
When you master your gunnery, you will enter the combat with confidence and sense of superiority.
None of our enemies has the same opportunities for training in gunnery which you have.
So, train as much as possible.
Stay alert during the air combat!
The one who sees his enemy first already won half of the victory!
No sudden head movements!
You must smoothly scan the area around and behind you, so you won't miss the enemy, even at long ranges.
Concentrate your attention on checking the air space. Know where our comrades are and don't be separated from them.
If you stay behind, you will be shot down!
When enemy is in sight, quickly check:
Guns: switched on?
Guns: loaded?
Indicators visible?
Gun sight is on?
Sighting image is not too bright?
Stay calm. Normally you still have plenty of time before open fire.
A. Attack from behind.
If you attack directly from behind, you must correctly estimate the range to open fire.
The enemy may appear close enough, but its an illusion.
Put your target in the deflection circle and you will know the range accurately.
The 2-engine bomber fits exactly into the space between the horizontal sighting lines, therefore, it fits into the circle diameter 5 times.
So, its range is 5 x 2 = 1000 meters.
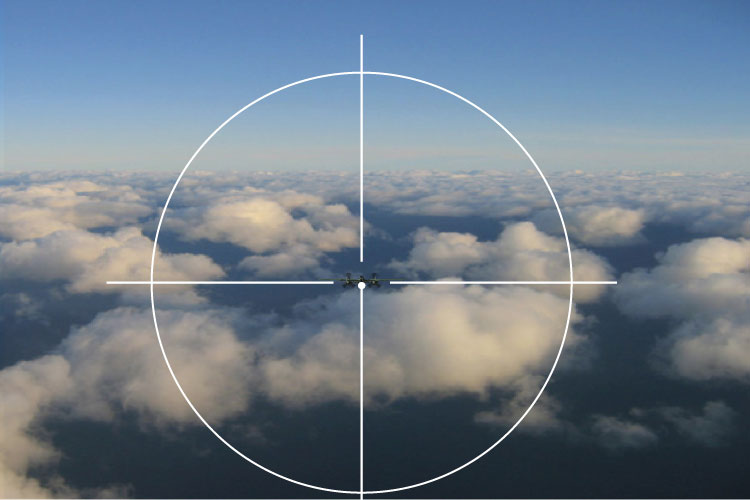
Fig. 23: 2-engine bomber. Range 1000 m
Its still too far away.
If you open fire now, you'll miss and only alert the enemy. So, keep approaching!
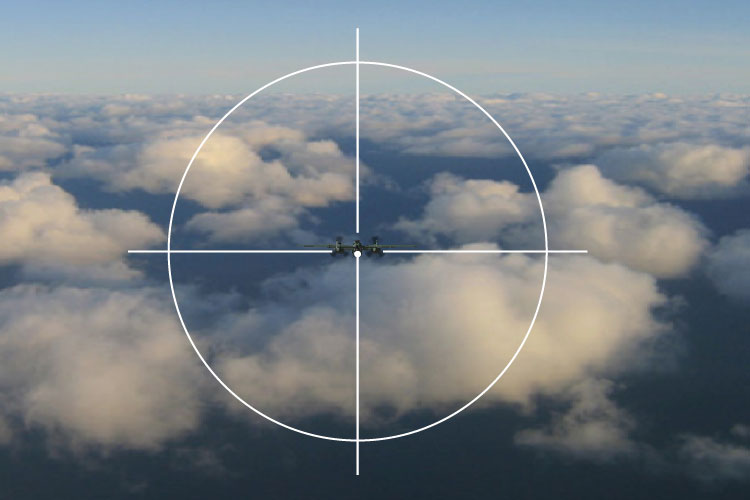
Fig. 24: 2-engine bomber. Range 600 m. Now it fits into the circle 3 times. You are still at 3 x 2 = 600 m range.
Now distance to the target is 400 m, aim at the center of the target!
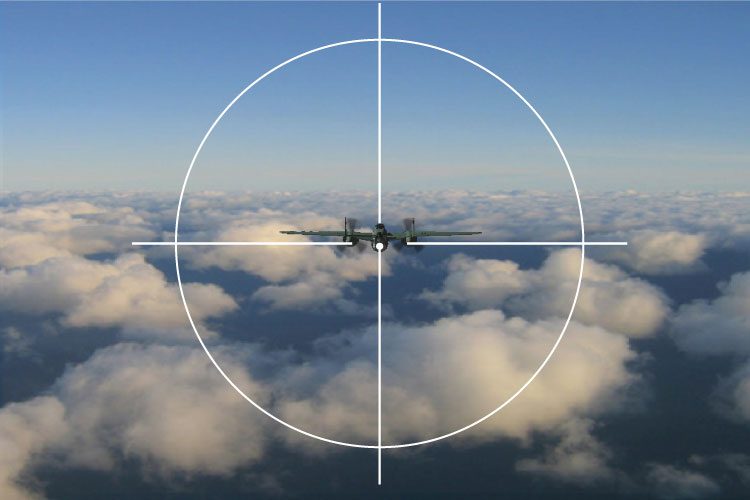
Fig. 25: 2-engine bomber. Range 400 m.
Open fire!
Watching your tracers, keep attention on the gun sight!
Short bursts! As soon as the sight slipped off the target, stop firing.
Stay away from target's turbulent area, otherwise your aircraft will be shaking and you won't be able to aim accurately.
You are now at the range 200 m;
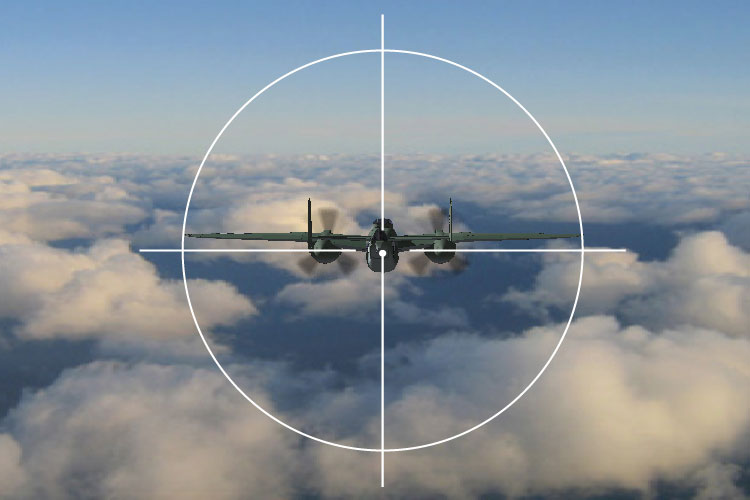
Fig. 26. 2-engine bomber. Range 200 m
Now range is 100 m
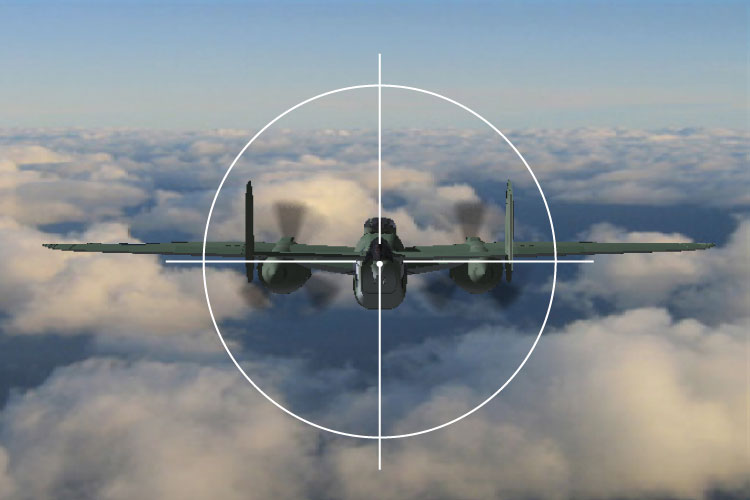
Fig. 27: 2-engine bomber. Range 100 m
You can clearly see where the bullets hit the target and the damage they inflict, and can now concentrate on individual parts of the enemy's airplane like the fuel tanks and engines. You can now fire with highest accuracy.
Note the location of your victory, time and altitude, and return to your unit.
Attacks from behind usually are not easy.
Normally you will need tenacity and gunnery skills to be successful.
B. Pursuit curve attack
An enemy bomber unit has been dispersed. The lonely 4-engin bomber is located to your left and slightly below.
Attack! Close in!
You are approaching from the side, start laying out deflection.
First, turn in towards your opponent until your sighting image is about 4R in front of the target.
Then turn your aircraft towards the direction of the enemy. At this point it should appear as on the illustration below:
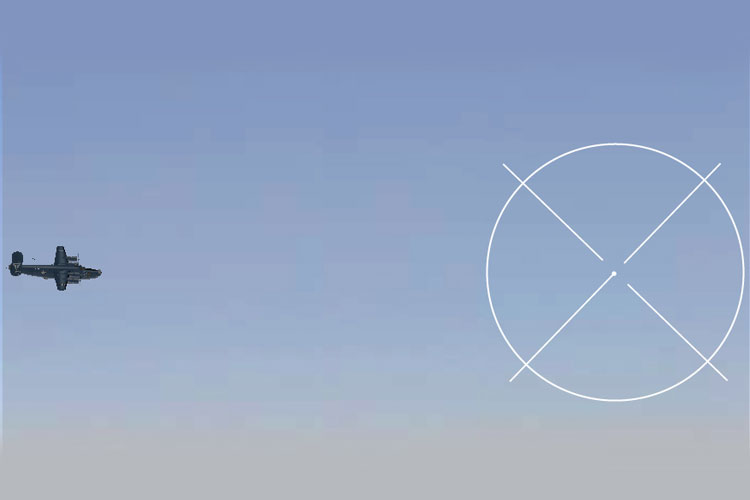
Fig. 28: 4-engine bomber. Range 1000 m. Deflection 4R.
You are still too far away. At this large distance don't open fire. Reduce the firing range!
As the range decreases, you will be coming in behind the enemy and your angle will decrease.
Smoothly reduce your deflection from the initial 4R to zero, when you will be directly behind your target.
Stay calm and don't use the rudder too actively! Your corrections will almost always be too rough, causing your sighting image to pass over the enemy.
Now range is 400 m from the enemy. The deflection is still 1R!
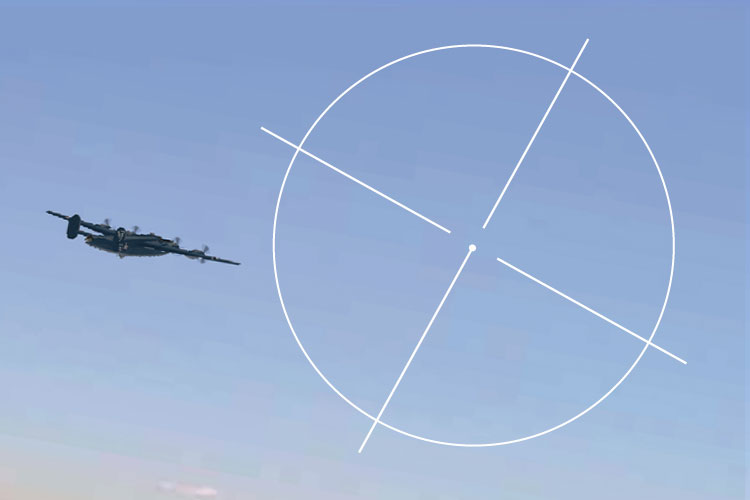
Fig. 29: Pursuit curve. Range 400 m. Deflection 2R.
Fire a short burst. Don't let yourself distracted by the tracers. They move to the left during a right-hand turn in the same way as a stream of water will move from a swinging hose. Concentrate your attention on the target and on the sighting image, and register the tracers only making it to the target.
Watch the direction of flight of your target. If you got it wrong, you will miss even if deflection is chosen correctly.
Let the target move slowly towards the center of the deflection circle. At this point the deflection should still be 1-1/2R!
Target appears huge, but its an illusion.
It fits into the circle. Therefore, range = 300 m
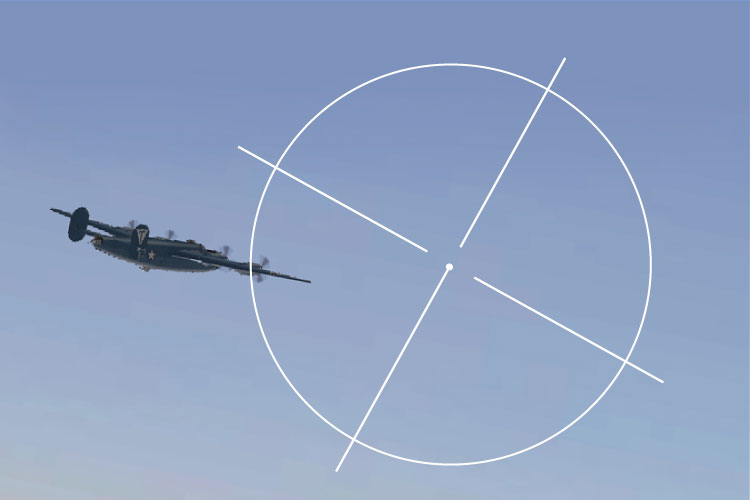
Fig. 30: Pursuit curve. Range 300 m. Deflection 1-1/2R
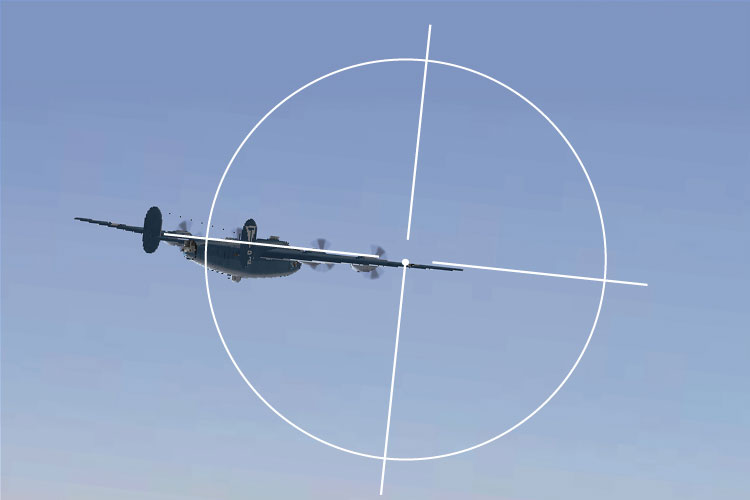
Fig. 31: Pursuit curve. Range 250 m. Deflection 1/4R
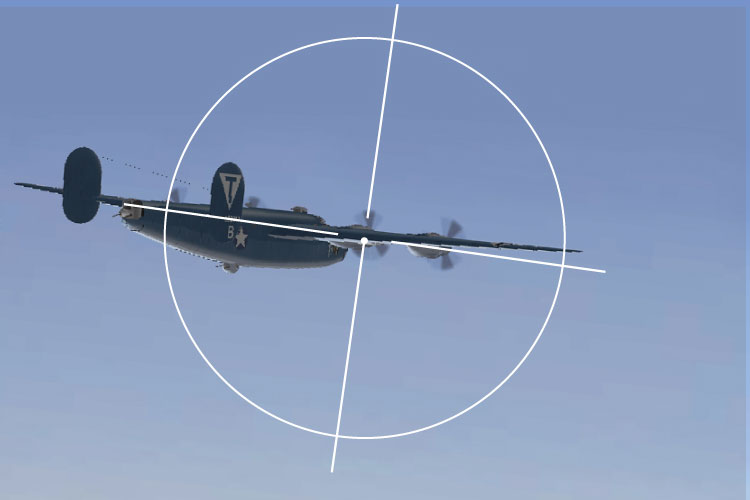
Fig. 32: Pursuit curve. Range 200 m. Deflection 1/2R
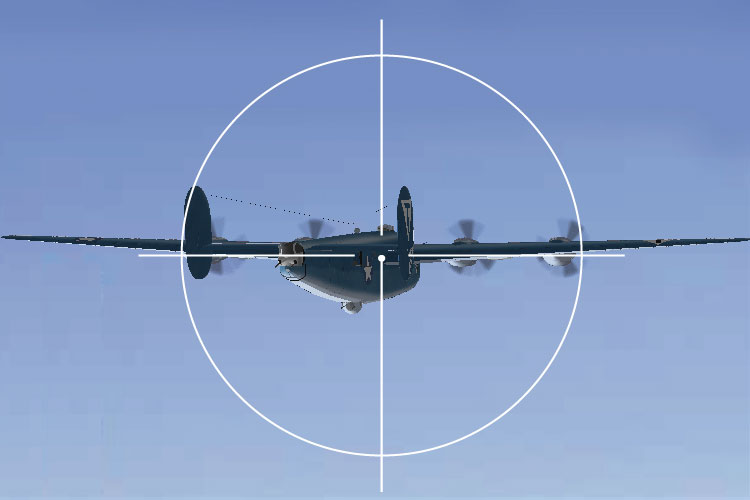
Fig. 33: Pursuit curve. Range 150 m. Deflection 1/4R
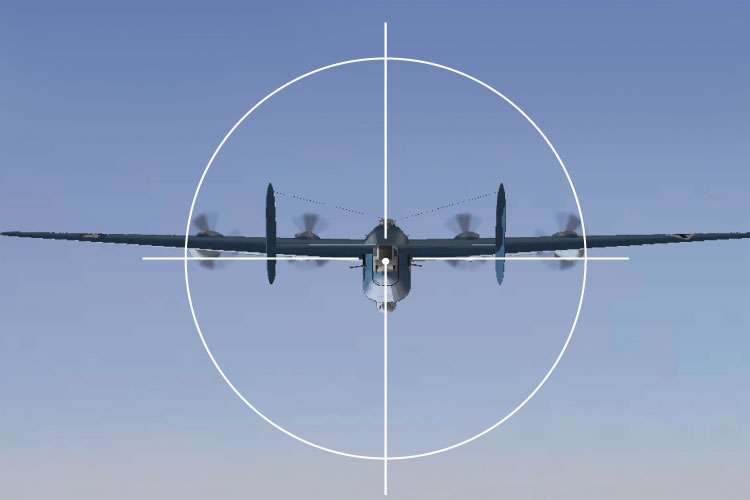
Fig. 34: Pursuit curve. Range 100 m. Deflection 0
Fire continuous burst until the enemy goes down.
He will go down!
C. Dogfight
Air combat with enemy fighters. Suddenly you're in the middle of it.
Keep your eyes open! Stay calm!
If you get nervous, you'll lose!
Here is one in front of you. Range 200 m.
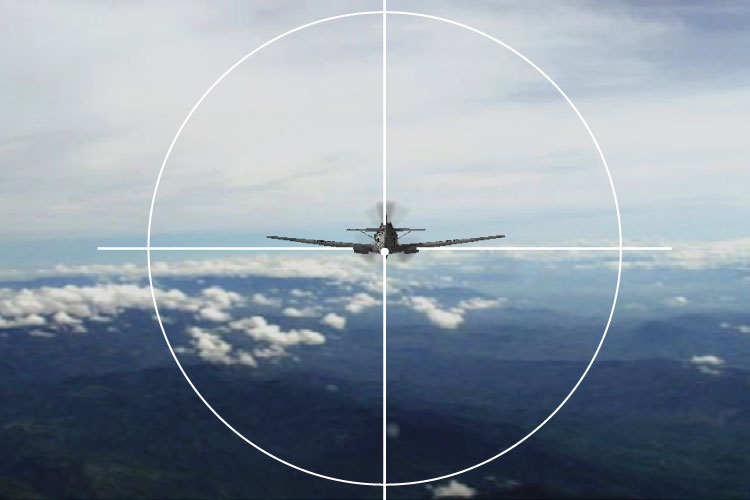
Fig. 35: Fighter. Range 200 m
Fire a short burst.
Your opponent immediately turns. Stop firing, or you will firing behind him!
First you must build up your deflection and not just fire away wildly!
Save your ammunition for the right moment.
Turn with him and build up your deflection!
Remember, if you pull your machine into too sharp a turn, your airplane will stall!
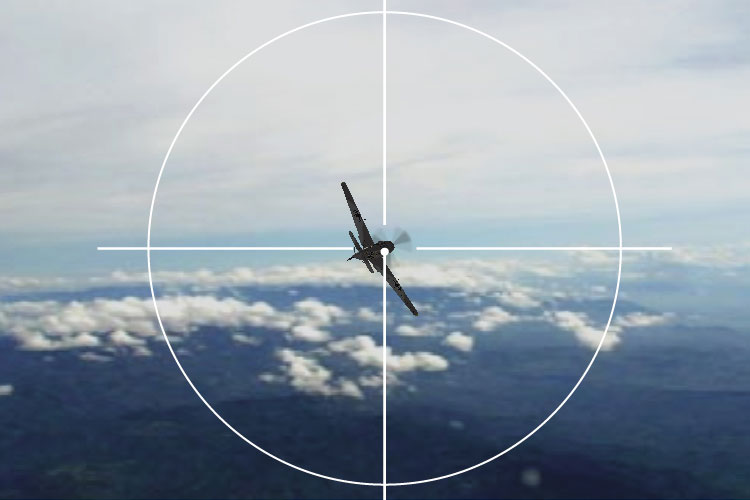
Fig. 36: Wrong! No deflection
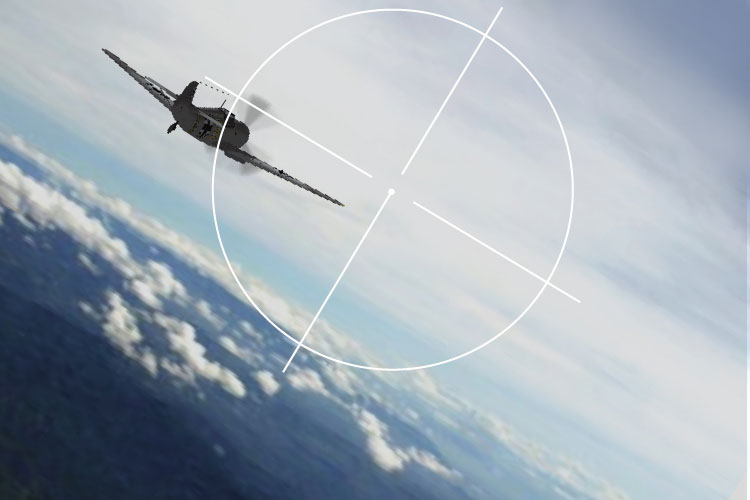
Fig. 37: Fighter. Range 150 m. Deflection 1R
Fire! The enemy is turning tightly.
Stay with him!
Maintain correct deflection along his line of flight.
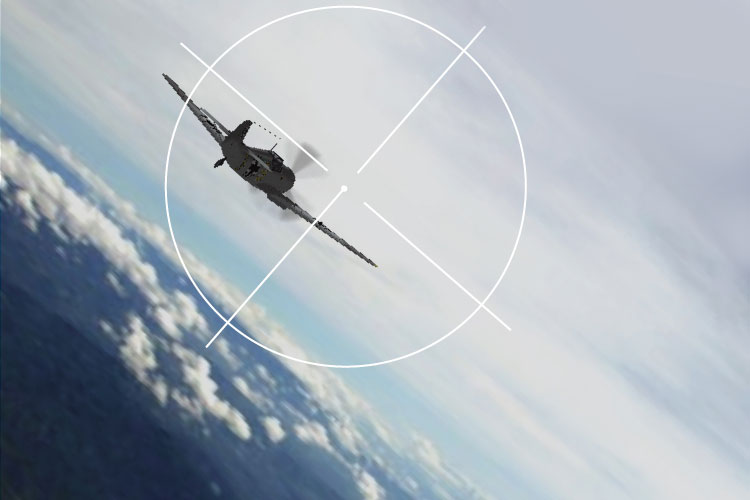
Fig. 38: Fighter. Range 100 m. Deflection 1/2R
Very good! Fire another burst. The angle doesn't matter, its influence on the deflection is so negligible, that you may not worry about it.
The enemy is turning tightly. You cannot turn inside him to maintain your deflection. Stay with him, so that you can immediately get into firing position.
Now you are again in firing position!
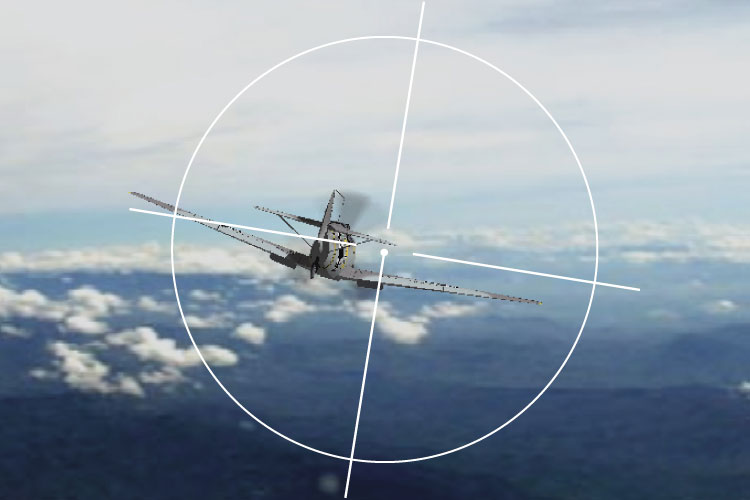
Fig. 39: Fighter. Range 100 m. Deflection 1/4R
He is getting hit.
He is attempting to turn to the left. Now you are directly behind him. Aim right at him and fire!
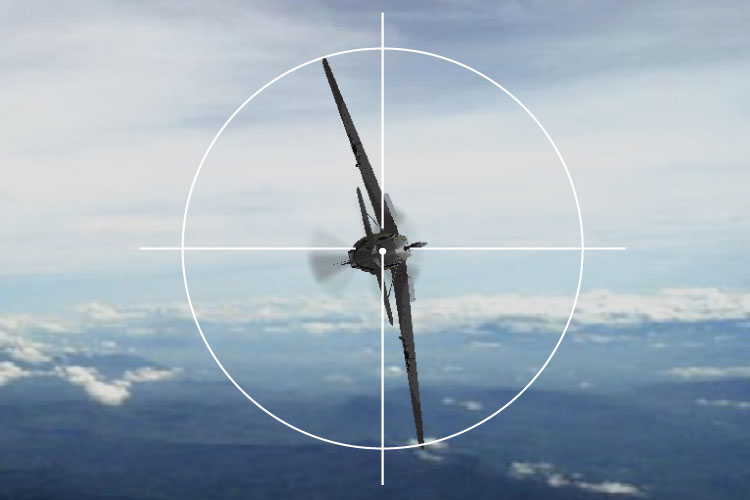
Fig. 40: Fighter. Range 100 m. Deflection 0R
Now he's burning and going down!
D. Frontal attack
A large 4-engine bomber formation is approaching. Start head-on attack.
You must approach the bomber formation close enough to determine exact line of flight. Continue in the same direction as the enemy until you are 4000—5000 m ahead of him—so that the formation you are attacking can be seen over your left, or right horizontal stabilizer.
Turn in with a tight turn and with your engine throttled back slightly.
Now the precision approach flight begins. If you positioned your aircraft carefully you can improve your approach. Remember, you must attack directly head-on.
At these ranges small differences in line of flights are very difficult to detect. Such differences are very small at the beginning of your approach, but they will increase rapidly at smaller distances and make you increase deflection so sharply, that you can rarely compensate for it in the very short time frame.
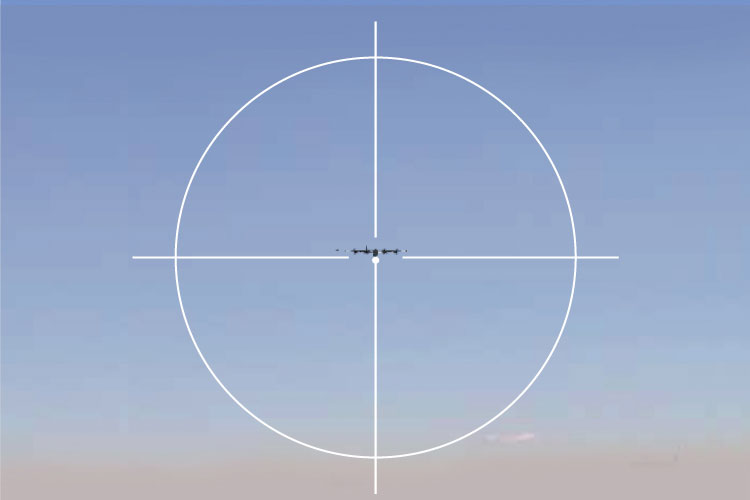
Fig. 41: 4-engine bomber from the front. Range 1500 m
This is how your target appears in the gun sight.
Approach the target directly head-on. No deflection!
A few well-aimed hits will bring down the enemy. In head-on attacks often three and more 4-engine bombers were shot down during a single sortie.
Watch the combat range!
Its still too far away. Now it fits into the circle five times, therefore it is at 5 x 3 = 1500 m range. The range is decreasing very rapidly since you are moving towards the enemy with air speed 150 meters per second and the enemy is approaching with air speed 100 m/sec.
The range is decreasing at the speed 250 meters per second!
You can fire from the range 800—300 m, so you have 2 seconds to fire.
Its during these two seconds that all action happens!
Enemy is at 900 m.
Make ready!

Fig. 42: 4-engine bomber. Range 900 m
Aim slightly above the fuselage and open fire!
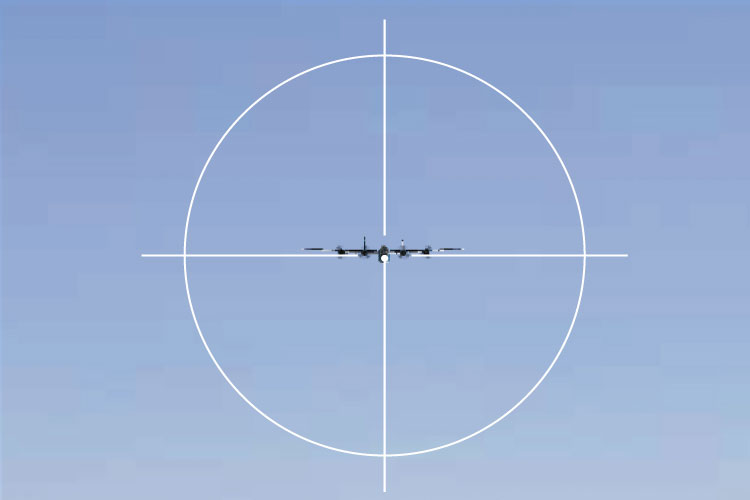
Fig. 43: 4-engine bomber. Range 800 m
Continue fire while moving the sight smoothly into the center of the fuselage.
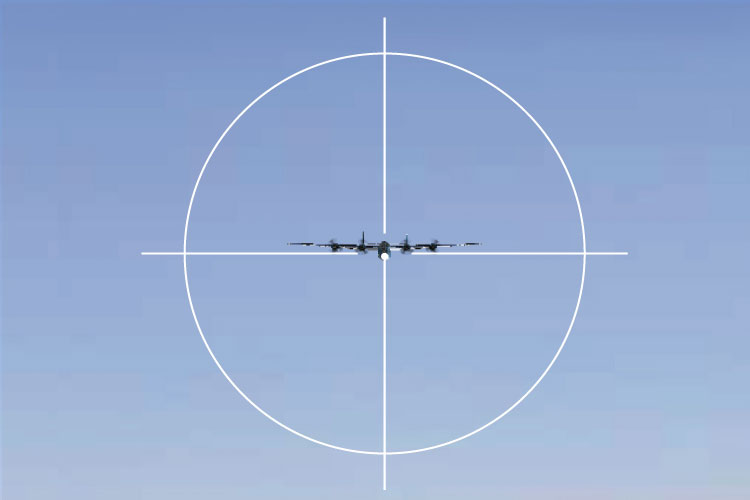
Fig. 44: 4-engine bomber. Range 600 m.
The target is approaching quickly and appears to be getting huge.
Keep firing!

Fig. 45: 4-engine bomber. Range 300 m
Watch out! Sharply turn away, forcing enemy's air gunners to react to fast changes in direction and deflection!
They will not be able to make it.
After the first pass, return to the direction of flight of the enemy formation; and pull ahead of it for another attack.
Attack again and again! Until the enemy goes down!
Think of our cities, think of our mothers, wives and children - their lives now are in your hands, so attack ruthlessly and relentlessly!
Your determination and skills are the decisive factors.
Only one thought: Destroy the enemy!
1944
[Due to the poor quality of the original images, they were substituted by CGI, feauturing Bf-109, B-25 Mitchell, B-24 Liberator, and DH.98 Mosquito]