Slave to the Game
Online Gaming Community
ALL WORLD WARS
Ju-88 FLYING OPERATIONS
Ju-88 in Flight
A. GENERAL GUIDELINES
1. General
Ju 88 is "one man's airplane" when speaking about flying it, as one man, the pilot, is able to use and oversee the engine and flying controls during normal flights.
Only during long-distance flights manual pump has to be used in transfer pumping of lubricant, and in special cases manual operation of fuel valves and pump in transfer pumping of fuel is tasked to two other men (wireless operator or machine gunner).
Table of performance values for the plane (see figures 7, 8 and 9) in question can be found in it's slot in the upper middle part of the instrument panel.
Maximal permissible values for engines are marked in the indicators and instruments with red line or self illuminating markings.
Different controls have explanation signs.
2. Flying Characteristics
The airplane is stabile on all axis', and fully capable of instrument flying.
Rudder forces and rudder effectiveness are balanced and adequate for all (also single-engined) all states of flight.
When the airplane is pulled in to excessive angle of attack (either with landing flaps closed or fully open), the attitude of the plane will only change laterally nose down. If the speed is reduced to value V-landing, the approaching attitude change will manifest itself as vibration in the elevator.
Rate of descend with landing flaps hilly open is
Approx. 20 m/sec (Ju 88 A-1, A-5 instead 15 m/sec)
Rate of descend with landing flaps closed, is
Approx. 15 m/sec (Ju 88 A-1, A-5: 10-12 m/sec)
Rudder effectiveness when in excessive angle of attack, at speed of 180kmh, is adequate. Banking turns with flaps extended are fully possible.
In turning flight only small deflection of rudder is required. Amount of banking is determined by the use of turn and bank instrument.
Trim changes when adjusting landing flaps and also when retracting and lowering the undercarriage cause such a small lateral moment in the entire speed range, that it can be easily compensated with small elevator response.
When adjusting the elevator trim plane slightly tail heavy.
Difference in the flying attitude on the other hand when landing flaps are closed and on the other hand when the landing flaps are hilly opened and elevator is set in the corresponding position (landing- and cruise positions), is large. Therefore when gliding special attention has to be paid on the speed indicator.
Aerobatics are prohibited (see paragraph "Flight in inclined plane")
3. Hydraulic system
Hydraulic system configuration is such that when using several devices simultaneously, only one of them functions at a time.
Using the so called "priority switch" makes it possible to always give priority to undercarriage operation.
After each operation of hydraulic devices the operation switch has to be returned to 0- position, i.e. middle position, not including the dive break switch which only has the positions "closed" ("Ein") and "open" ("Aus"). In this case position "closed" ("Ein") equals to zero-position.
4. Loading the plane
Before boarding the plane it is the responsibility of the pilot to ensure that the loading of the plane has been done correctly and according to loading instructions.
Load-out sheets for the airplane and different load-out options are located in a case behind the wireless operator's seat (see also figures 10-23).
ATTENTION: If the regulations are not followed it will lead in Ju 88 planes contrary to previous plane types, with great probability to structural breakdown, due to the existence of alternating loads exceptionally far from the centre of gravity.
When batteries, wing racks or something else (for test flights at the factory or during transfer flights) is removed from the plane, it will become nose heavy over the permissible value. In such case counter weights must be placed in the rearmost bomb-bay or inside the fuselage according to the loading regulations (tied in place). This has to be noted especially on Ju 88 C-6 airplanes. See also part I C and part III B 3f.
5. Crew
Crew consists of four men:
1. Pilot of the airplane (Commander of the plane), on pilots seat.
2. Bombardier (Co-pilot), in "A-position" ("A-Stand").
3. Wireless operator, in "B-position".
4. Mg-operator, in "C-position"
Crew of the Ju 88 C-6 airplane consists of three men:
1. Pilot of the airplane (Commander of the plane), on pilots seat.
2. Bombardier (Co-pilot), in "A-position" or "C-position"
3. Wireless operator, in "B-position".
CLOTHING
The whole crew is wearing light summer overalls with summer flying hoods, with microphones for speaking- (EiV-) apparatus.
PARACHUTES
Pilot and wireless operator: parachutes for sitting on. Bombardier and mg-operator: parachutes on back.
6. Flight readiness report
Crew chief must give the pilot of the airplane a report according to the "Flight readiness table", that the plane in question, with engines not started, is ready for flying operations, (see part I "Flight readiness report"). Pilot uses spot-checks to verify that the report is correct. If there is no trained responsible mechanic present, pilot can perform the flight readiness checks himself.
B. PREPARATIONS FOR FLIGHT
1. Entry
Crew enters the airplane when engines are not running.
Rearmost part of the gondola is opened (C-position) with a key, entry using the ladder. When entering the airplane only using the handles and footholds for the purpose is allowed.
Attention has to paid that none of the switches, levers or adjustment handles are either pushed or caught in by clothing when entering. And thus turned or switched to unintended positions.
Pilot boards the plane first. Machine gun operator pulls the ladder in and puts them in collapsed in the sheet metal storage in the C-position.
The gondola gun mount is forcefully pulled up with the help of the arrestor rope: the locking lever in the inside is turned right as far as the red mark.
2. Re-checking of the position of flying and plane controls
The pilot of the airplane checks the the automatic fuses in the in the hisebox above the C-position when boarding.
A 11 fuse switches (not counting the switch "external circuit" ("Aussenbord") and also 2 switches "VS automatic left engine" ("VS Automatik links Antrieb") and "VS automatic right engine" ("VS Automatik rechts Antrieb") are switched on and if it will be a high altitude flight the 4 oxygen bottle valves in the left side wall of the gondola are open.
All other switches can be switched on if necessary on the fuse box on the pilot's left side or from the radio equipment.
Hydraulic auxiliary switch for emergency use of undercarriage, undercarriage bay doors, dive breaks and landing flaps must be in positions 3 and 5.
Pilot fastens his seat belt.
The lever actuating the Bowden-line for adjusting the back belt is located in front of the seating bucket.
The seat is adjusted according the body size in to the best possible position, that is, to a position with best visibility and best possible operation of rudder and all levers (lever in the left lower side of the seat is pressed outside when adjusting the longitude distance of the seat, and lever on the right side of the seat is pressed outside when adjusting the height of the seat.
ATTENTION: When adjusting the seat one must not accidentally push the bomb jettison lever.)
Side rudder pedals, right and left, are set to equal height (switch in front of the foot pump is raised). By rotating the body it must be possible to reach hill rudder deflection and also it must be possible to brake simultaneously, also it must, when rudder centered, be possible to reach adequate steering deflection with the steering yoke.
All control movements must happen unhindered and rudder deflection must match the pedal movement.
"Fine - coarse" altimeter must be set according to the starting place to show the the height from the sea-level (QFF).
Accuracy altimeter is set to indicate zero on the field(QFE).
Trim tab position indicators (on the left panel) are in the middle marking (will be set to red marks only before diving).
When taking off with especially high take-off weight corrections are made already before start by adjusting tail-heaviness by with elevator trim tabs. Trim tab hand cranks have effect in the same direction to which they rotate.
Levers oft he undercarriage and landing flaps are in the 0-position.
Switch of the dive-brakes is in position "Closed" ("Ein") (equals to 0-position).
If the outside temperature is below 0 degrees Celsius Pitot-pipe heating is switched on.
De-icing equipment operating levers for the left and right wings and elevator are in the position "Closed" ("Zu").
Lever for air filtering is in position "Suction through the filter" ("Ansaugluft Gefiltert").
Supercharger operating lever in position "Automatic" (during instrumental take-off it will be set to that position only when 3500m is reached.
Primer pump lever is in position "Normal" ( also see paragraph C 5a and 5b).
Throttle lever must be tightened as much that it is heavy to move, and there is no chance that it could move by itself.
RPM selector lever must be set to "RPM increases" ("Drehzahl grosser").
It is inspected that the lid of the emergency fuel jettison switch in the switch box, as well as the switch of external fuel tank jettison and switch for rubber dinghy release are all equipped with lead seals.
Automatic direction steering (low left on the instrument panel) is in position 1, direction setter on the control yoke is set to 0.
Emergency bomb release switch must be sealed. Fall switch is locked.
Engine start is performed as explained in paragraph 1 C 8.1 Then it must be noted:
a. When temperature is below + 5 Celsius cold starting method is to be used.
b. Note the regulations for warming engines up if cold starting method is used.
c. Note the regulations for starting in the arctic areas.
ATTENTION: After starting the engines dive-break switch is turned on once and then the pull-out button on the left panel is pressed (not the bomb release switch).
If the take-off is delayed, engines have to be stopped.
3. Taxiing for take-off
Radiator flaps are fully opened.
ATTENTION: Normal time that it takes from the position "Closed" ("Zu") to position "Open" ("Auf") and the other way around is approx. 8 sec. The longest permitted operating time for the cowl flap engine is 15 sec. Machine gun operator is sitting on the folding seat facing the direction of flight. Laying in the gondola is forbidden. Entry hatch has to be closed during all taxiing (otherwise gondola will be filled with sand). Taxiing is performed, if at all possible, by using the engines and the rudder. During taxiing it is inspected that the wheels can rotate freely and the brakes are not braking independently. When the take-off weight is greater taxiing is performed with utmost caution and only at slow speed; constant turning is to be avoided. Turning on one wheel is prohibited.
Brakes have to be spared: braking has to be interrupted every now and then (excessive overheat).
When taxiing elevator is kept in the middle position (not cooled) to reduce the tail reaction. Turn and bank instrument is inspected. If airplane has been started with the co Id start method, the temperature of engine oil when taxiing or longer duration idling must not exceed over 30Y In exceptional cases it may be allowed to reach 70KC (in winter time) or +851C (in the summer time - half thinned lubricant). If temperature exceeds 701C or 851C, the take-off has to be, if possible, aborted, until the temperature decreases.
C. FLIGHT
1. Take-off
ATTENTION: The VS-11 propeller that is installed on the airplane has a pitch governor, which will keep the RPM constant.
WARNING: The manifold pressure will rise very rapidly when throttle is increased.
Tail wheel is self-centering. No locking.
Pitot pipe heating is switched on, if air is very moist and temperature is below 01C (switch to the left of the pilot).
Fuel pump selector (FBH) levers are in position "PI + P2". Valve battery switch A is in position II.
Both feeding pumps "Fuel left" ("Kraftstoff links") and "Fuel right" ("Kraftstoff rechts") are engaged.
Landing flaps are in the take-off position (251) (lever in middle position, with the old indicator and yellow lamps on, with nine-lamp-indicator).
Elevator and rudder must have unrestricted movement.
Automatic direction steering is not switched on.
RPM selector switch is in the limiter "RPM increases" ("Drehzahl grosser").
Enricher switch "Normal". Throttle is pushed forward until the limitor "Start" ("Start")
1 min power
nmax= 26 00 +20 /.50 RPM
pmax= 1,40 +/. 0,03 ATA
Excessive RPM is evened out by turning the RPM selector switch to direction "RPM decreases" ("Drehzahl kleiner"). Such event has to be reported to crew chief immediately after landing.
The veering out of course has to be corrected by asymmetric throttling.
The airplane is pushed smoothly and slowly to level attitude and then hel d there until air speed indicator is showing the slowest necessary speed for the current loading.
Only after that it is slowly pulled off the ground. The moment of list-off is noted.
The rolling distance needed for the take-off, when the effect of cross- wind is not taken into consideration, is for different take-off weights:
| Distance on ground | Overall distance over 20 m obstacle | |
| 12.5 ton | 570 | 1280 |
| 13.0 ton )airplane | 650 | 1350 |
| 13.75 ton )oberloaded | 750 | 1420 |
Take-off during day with overloaded airplane is only allowed from concrete surfaced airfield, up to 13,75 tones from a prepared airfield or hard, even surfaces grass airfield.
Take-off during night is only allowed with 13 ton weight.
Additionally the numbers for take-off roll given by Rechlin have to be noted (see appendix in the end of this part).
Lift-off speed:
Va= 175 km/h when take-off weight is 13 000 kg
Va= 180 km/h when take-off weight is 13 750 kg
With smaller take-off weights the lift-off speed is a little smaller.
When sufficient altitude has been reached (approx. 30-50 m), the throttle is moved from the position "Start" ("Start") to position "Climb power" ("Steig leistung") and at the same time propeller pitch lever to the according RPM.
For 30 min. time power can remain (climb and combat power)
n=2400 RPM
p=1.25ATA
Propeller pitch governor will thus keep the selected RPM in all states of flight, if they are within the limits of propeller mechanism.
2. Retracting the undercarriage. (Also opening and closing the landing gear bay doors.)
Undercarriage may remain lowered only when indicated air speed is below 265 km/h. Shortly after taking-off wheel brakes are depressed gently and the undercarriage is retracted.
Undercarriage operating lever (instrument panel is set to position "In" ("Ein").
Both undercarriage halves and the tale wheel are fully retracted and locked as well as the landing gear bay door closed, when the signal lamp indicates the retraction complete, i.e. the upper red signal lamps of the nine-lamp indicator are lit (in older airplanes the indicator apparatus).
Hydraulic oil system pressure gauge (in the engine cowling) shows after retraction approx. 85-95 ATA rise of pressure. The operating lever is turned to middle position (0 position). Pressure gauge will return to 15-22 ATA.
Retraction time (undercarriage and undercarriage bay doors) is about 15-20 seconds. Early retraction of the undercarriage immediately after the take-off will cause altitude gain.
3. Take-off with start rockets (If installed.)
During engine warm up ran, from a pilot's signal, special mechanic will open the pressure air valve of start rockets.
Special mechanic will give the all clear sign for taxiing. Before take-off the start rockets which are turned on. All signal lamps including the red lamps must then turn on in the start rocket switch box.
Landing flaps, trim tabs and propellers etc. are adjusted in the take-off without the start rockets.
After about 10 sec. of take-off roll equaling 100-150 m distance, the bombardier will depress the button in the start rocket switch box or in the right hand side instrument panel thus switching on the take-off aids. Then the lower signal lamp will turn off.
If take-off has to be aborted for one reason or another it can be done by turning the switch in the start rocket box or in the right hand side instrument panel to position "Off' ("Aus"), thus immediately switching off the rockets.
Under no circumstance it is allowed to turn on the start rockets that have been once turned off. Undercarriage is retracted immediately after take-off. The airplane must not be pulled too hard because after 30 sec. the thrust will be reduced and the airplane pulled on to too high angle of attack will be prone to stall.
When the rockets have emptied 2x125 kg of extra weight and also additional air resistance. (Must be noted in turns and when opening landing flaps.)
Rockets are dropped by the bombardier at not less than 125 m from the ground.
Release lever (which is kept behind pilot's seat) is put on its place to right, low next to the pilot's
seat and the lever is pulled up.
Rockets are not allowed under no circumstance to be released when in use.
Nevertheless the pilot can at any moment without any danger release the rockets either using them up or switching them of before the release.
Only in emergency the release will be done at less than 150 m, because then the parachute will not
have time to open and the rockets will be broken.
Rockets have been properly jettisoned when the markers disappear.
If after operating the release lever one or both signal lamps are still on, the airplane is briefly pulled when holding the release lever pulled up. If the rockets do not drop the flight has to be aborted. Landing with the rockets aboard will be executed ordinarily as long as the maximum landing weight is not exceeded.
After releasing the rockets the rocket switch box switch has to be set to position "Off ("Aus").
4. Climbing
Landing flaps are raised to OY position after retracting the undercarriage and when safe altitude is reached.
Speeds at most efficient climbing flight:
Va = 250 km/h close to sea-level
Va = 240 km/h at 6000m altitude.
Smallest speed Va = 230 km/h.
No later than after 30 minutes the throttle and along with it, the propeller pitch lever, must be returned to the position of normal power:
Up to 6500m altitude
n = 2250 RPM
p= 1.15 ATA
Over 6500m altitude
n = 2400 RPM
When initial climb has ended and approximately 500m altitude has been reached, must the switches right of the machine gun operator position "VS automatic, left engine" ("VS Automatik, links Antrieb") and "VS automatic, right engine" ("VS Automatik, rechts Antrieb") must be pressed.
Enriching lever is kept during climb in "normal" position of the normal - rich alternatives until the rated altitude (of the super charger).
When over the rated altitude and maximum power for combat is needed, Enriching lever(lever left of pilots seat) must be kept in position "Rich" ("Reich in Hohe"). After the combat has ended lever is set again to "normal" position.
Changing super charger gear
Gear change happens automatically in the position "Automatic" ("Automatik").
a. In climbing flight the change from low gear to high gear happens at 3,0 km +/.300m altitude.
b. In descending flight the change from high gear to low gear happens even 400m lower than the change happened in climbing flight.
c. Depending from the position of the throttle lever. If throttle is reduced in 3500m altitude, the automatic control will change the gear to low when ATA is 0,7 - 0,85 and RPM n = 2400. At higher altitude with equal throttle setting ATA is respectively lower. When throttle is increased again the high gear is automatically engaged at approximately same position where it was disengaged.
If the gear change happens in the engines happens at unequal height, the automatic control has to be repaired (on the ground) in such way that both engines will switch gears nearly simultaneously.
If one of the engines switches too early, the gear switching lever is held switched until the second engine switches gears.
When manually switching gears it is imperative to reduce the throttle in advance. After the gear change has happened the power is returned again to cruise setting.
When switching from low gear to high gear manifold pressure can rise over the permitted until the adjusting mechanism catches up.
Manifold pressure adjuster
Manifold pressure, when once set, will remain automatically the same all through the climb without adjusting the throttle, until the gear changing altitude is reached. At that time one must not compensate the drop with throttle or the manifold pressure will rise too high after the gear-change.
Automatic direction steering
Automatic direction steering must not be switched on until 300m altitude has been reached.
Operating temperatures and pressures
a. Temperature of retuning cooler fluid
It must not drop below 401C (when descending), and it is mostly between 80 - 1001C in cruising and following values should not be normally exceeded:
| Altitude km | 0-1 | 4 | 8 |
| YC | 110 | 100 | 80 |
Limit for evaporation of the fluid is a few degrees above these temperatures. If the limit is exceeded, the circulation of the cooler fluid does not stop (contrary to Jumo 211 A, B and C engines). In special cases e.g. on hot summer days, while climbing, is the temperature of the returning cooler fluid allowed to rise up to 1201C (for short periods, approximately 10 min).
In normal situations the temperature has to be kept within the limits of the table above. The pilot of the aeroplane is warned about the of the temperature of the returning cooler fluid rising above 1201C by the steam formation; cooler fluid loss is small at that point.
When flying in such way that the steam is formed, throttle must not be reduced to idle position with one pull, because then the loss of engine RPM causes the pressure in cooling system to drop below of what is needed to keep up the main circulation, resulting in very heavy increase in steam formation and pressure build-up.
If the forming of steam is noticed at temperatures which are below the do-not-exceed values stated above, the breathing valve of the of the cooling system must be turned (in front of the cooler fluid container).
The problem has to be declared to the crew chief after landing.
When adjusting the cooler fluid temperature, also engine oil temperature has to be observed. The values given in the following paragraph must not be lower or higher than stated.
b. Temperatures for returning oil
The gauge is located in the engine cowling.
Temperatures must not be less than 30YC (when using the cold start method) nor more than 105YC.
In cruise approximately 80YC.
Adjustment happens automatically with thermostat.
If the maximal allowable temperatures for cooler fluid and engine oil are exceeded, cowl flaps have to be opened or engine power reduced.
When using the cold start method the engine oil temperatures are checked only after about one hour after take-off (when fuel has evaporated), although during this time, if possible, 701C(in winter) or 85IC(in summer) should not be exceeded.
c. Engine oil pressure
During warm up run of the engines (on the ground) minimum of 5,5 ATA, but not over 9 ATA Lowest pressure at rated altitude (high gear at n = 2400 RPM and oil temperature 60 - 701C) is 4,0 ATA. When using the cold start method reduction to 3,5 ATA is allowed.
d. Fuel pressure
1,0 - 2,0 ATA. When also fuel transfer pumps are switched on, it should rise to value 2,0 - 2,5 ATA. Fuel pressure must not drop above rated altitude below 1,0 ATA.
When fuel pressure drops to below 1,0 ATA the fuel booster pumps are electrically switched on. It has to be noted, that if these are only switched to PI, despite the switched on fuel transfer pumps, the pressure in P2 can drop already at low altitude.
Otherwise the fuel booster pumps will only be switched on during take-off, dive and landing (because of the possibility of abortion, and resulting pull and take-off).
After each enemy contact pumps are checked by first switching on P1, and then P2, so that damaged fuel lines could be immediately discovered.
5. Cruise
Enriching lever is in position "Normal".
a) Cruising speeds when mixture control is in position "Lean" ("Arm") and enriching lever in position "Normal":
| Altitude | V-w | Supercharger | P2((ATA) | n (RPM) |
| 300 | 350 | low gear | 1.15 | 2250 |
| 2000 | 390 | low gear | 1.15 | 2250 |
| 4000 | 400 | high gear | 1.15 | 2250 |
| 6000 | 400 | high gear | 1.10 - 1.15 | 2250 |
b) Maximum speeds when mixture control is in position "Rich" ("Reich") and enriching lever in position "Normal":
| Altitude | V-w | Supercharger | P2((ATA) | n (RPM) |
| 300 | 375 | low gear | 1.25 | 2400 |
| 2000 | 410 | low gear | 1.25 | 2400 |
| 4000 | 415 | high gear | 1.25 | 2400 |
| 6000 | 425 | high gear | 1.15 - 1.25 | 2400 |
In points a and b: the change of enriching to position "Rich" ("Reich") will happen automatically when the lever is set to position "Normal" and manifold pressure reaches 1,17 - 1,23 ATA.
Consumption of engine oil at 2250 RPM and manifold pressure at 1,15 ATA, is at the maximum ca. 12 liters per hour per engine.
Fuel consumption measuring (left out from the newer variants)
Switch in the left part of the instrument panel.
Instrument in the left part.
The following differences between indicated left and right engine consumptions are allowed in the enriching lever is in position "Normal":
When P2 = 0,8 and 1,0 ATA up to 20 1/h
When P2 = 1,25 ATA up to 40 1/h
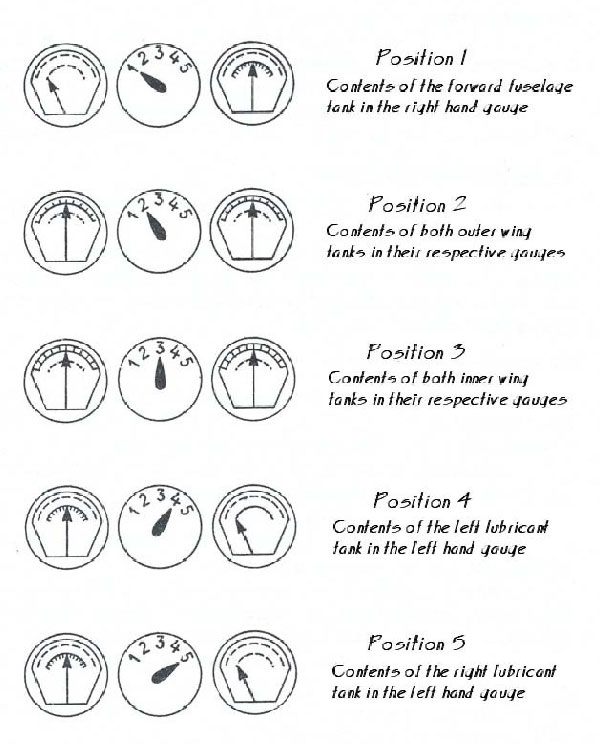
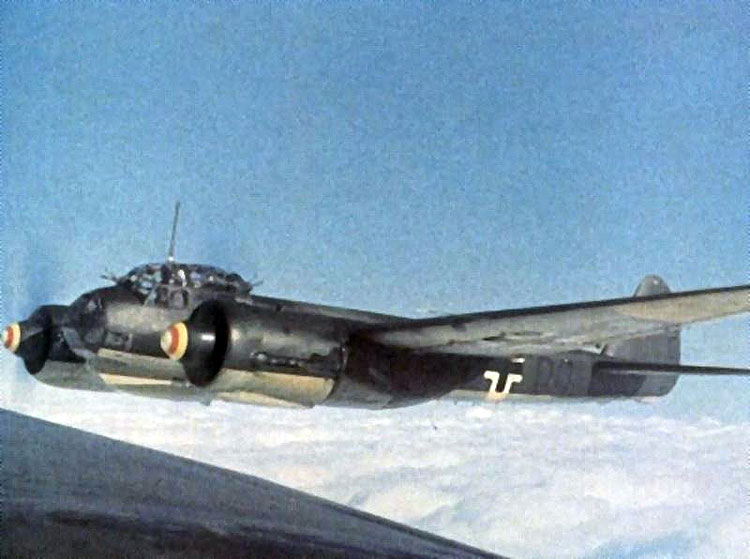
Fig. 1 Fuel and lubricant quantity gauges
Automated switch between normal - rich happens with manifold pressure 1,17 - 1,23 ATA
All other values:
Fuel consumption
Speeds
Best flying altitudes
RPM's and manifold pressures, and
Ranges and flying times
Are available for Ju 88 A-4 and it's variants can be found in "flying time table", made by flight research centre Rechlin.
Measurements of the fuel and oil quantities (see picture 1 )
Two instruments next to the selector switch on the right wall.
a. Measuring the quantity of fuel (scale for flying position), when switch is in
Position 1 : Quantity of fuel in forward fuselage tank is shown by the instrument on the right.
Position 2 : Left and right outer wing fuel tanks can be read simultaneously from the instruments on left and right.
Position 3 : Left and right inner wing fuel tanks can be read simultaneously from the instruments on left and right.
The quantity of fuel in two external, and rearward fuselage, fuel tanks is not measured.
b. Measuring the quantity of oil (scale for flying position), when switch is in
Position 4 : Left engine oil container quantity is shown on the left instrument.
Position 5 : Right engine oil container quantity is shown on the left instrument.
The quantity of oil in auxiliary oil tank is not measured.
In both points a. and b. measurements are imprecise.
Fuel intake to the engines happens only from both inner wing tanks (feeding tanks). Surveying of both of these tanks must be frequent. If fuel consumption is uneven, fuel amount can be balanced with the use of fuel transfer pump.
Fuel transfer pumping and connecting the tanks.
(See pictures 2,3 and 4)
1. use in normal situations.
In take-off the connection must be such, that both engines are fed from the inner wing tanks on their respective wings, their feeding tanks. Valve battery switch A in position II. If the aeroplane is equipped with jettisonable external tanks, one must not pump fuel from them to feeding tank at the earliest 20 min after taking-off, because otherwise the fuel will go to waste by leaking through the tanks air vent.
1. Switch box
2. Enriching switch
3. Fuel emergency jettisoning - forward fuselage tank
4. Fuel emergency jettisoning - rearward fuselage tank
5. Pull-out button
6. Two switches for fuel feeding pumps (fuel tank pumps)
7. Switches 1,2,3,5,6,8 for fuel transfer pumps
8. Transfer pumping diagram
9. Signal lamp for lubricant tank filling up
10. Signal lamp for fuel tank emptying
11. Signal lamp for fuel tank filling up
Fig. 2 Switch box for fuel transfer pumping and fuel emergency jettisoning
In normal situations the fuel has to be pumped only after the fuel level in both tanks should have dropped to 200 liters (that is after ca. 50 min of flying time).
Time taken by the transfer pumping of 300 liters is ca. 18 minutes.
If only one external fuel tank is carried, both engines have to be connected to that feeding tank (valve battery switch in position A I or III) which is fed by the external tank.
When both external tanks are empty, the radio operator jettisons, when in level flight at cruise speed or slower, the tanks by pulling the red tank jettison lever (between fuselage frames 8a and 8b) with force.
The aeroplane may be damaged if the jettisoning of the tanks is done at higher air speed.
Transfer pumping order.
The following order for transfer pumping has to be strictly followed.
Both drop tanks switches - 1 and 2
Rearward fuselage tank switch - 8
Wing tanks switches - 5 and 6
Forward fuselage tank switch - 3
Transfer pumping switch box is located on the left wall behind the fuse box. Switching the tanks (see picture 4)
Valve battery switch A.
(Down low in center at the frame 9) Is used for switching on fuel feeding lines to the engines.
Valve battery switch B.
(down low to right at frame 8, close fuel emergency hand pump) Is used for transfer pumping from both fuselage tanks.
a) Only to the left feeding tank
b) Simultaneously to both feeding tanks
c) Only to the right feeding tank
And also from left side outer wing tank as in points a) and b) and from right side outer wing tank as in points b) and c).
Valve battery switch C.
(up on the right, at frame 9) Is used in fuel transfer pumping in special (with hand pump) cases.
a) From left side outer wing tank
b) From forward fuselage fuel tank
c) From right side outer wing tank.
Also used for transfer pumping the fuel from forward fuselage tank in normal flight (position II).
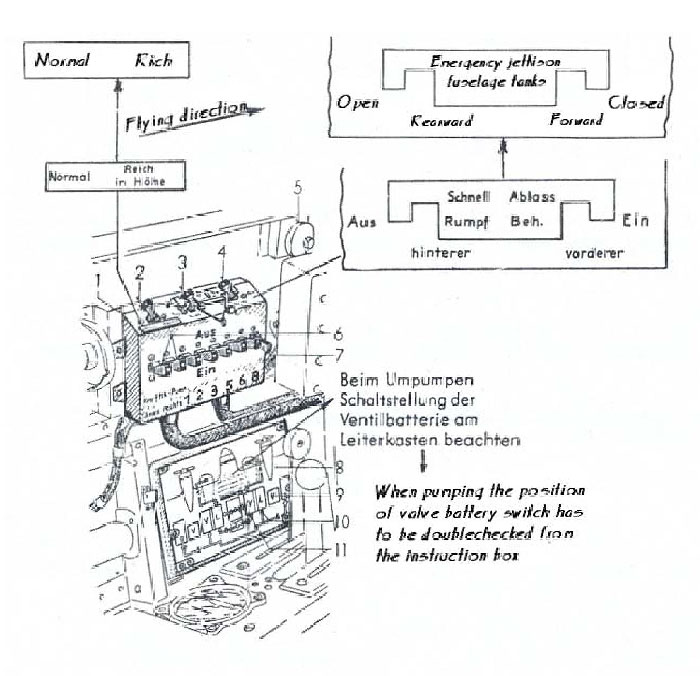
Transfer pumping and switching the fuel lines, when one or both jettisonable fuel tanks are empty, as follows:
1. Switching the fuel lines when transfer pumping. Valve battery switches A, B and C are in normal position II.
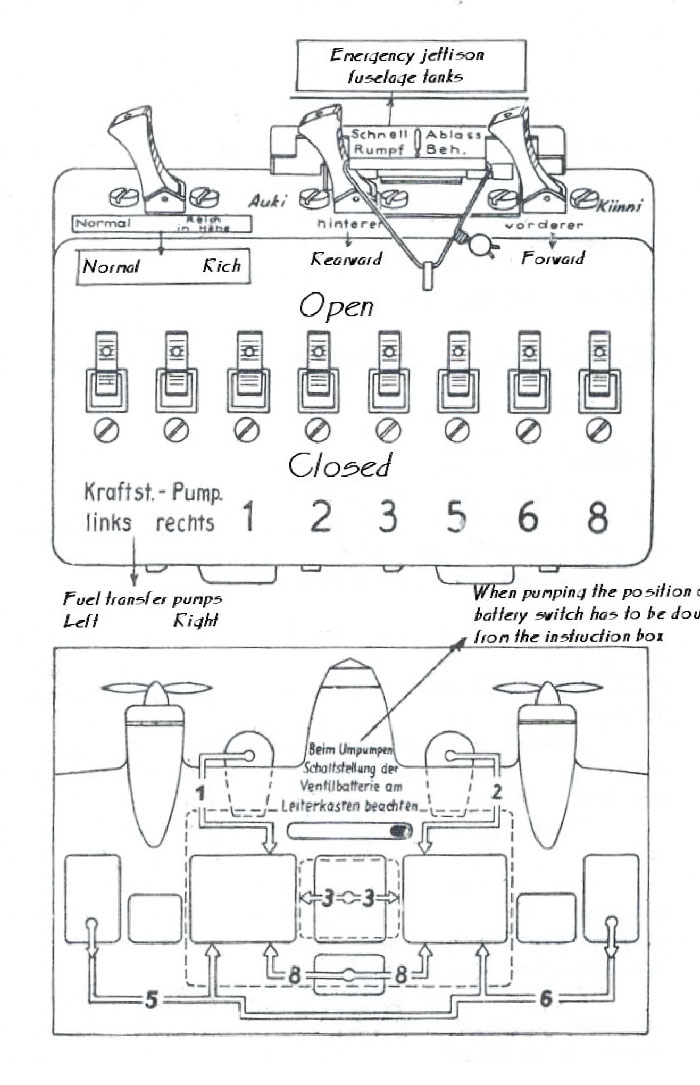
Fig. 3 The switch box for fuel transfer pumping and the fuel transfer pumping diagram
Both fuel pump selectors are in position "PI + P2".
2. Transfer pumping is done with the electrical transfer pumps
a. After first warning of emptying of the feeding tanks. Switch 8 is switched on, the contents of rearward fuselage fuel tank is pumped simultaneously to left and right feeding tanks. When the w a r n i n g of the feeding tanks filling up comes, fuel transfer pump is switched off until 10 minutes, and then again switched on, until the rearward fuselage tank is empty.
b. After second warning of emptying of one of the feeding tanks.
Switches 5 and 6 are switched on. In this case the contents of left and rig lit outer wing tanks is pumped to respective feeding tanks.
When the filling up warning comes, the transfer pumps are turned off, and swicthed on again after 20 minutes, and this is continued until both of the outer wing tanks have emptied.
c. After third warning of emptying of one of the feeding tanks
Switch 3 is switched on. In this case the contents of forward fuselage tank is pumped to respective feeding tanks. When the warning of the feeding tanks filling up comes, fuel transfer pump is switched off.
d. After fourth warning of emptying of one of the feeding tanks.
Switch 3 is switched on again. Fuel left in the forward fuselage tank is pumped to the feeding tanks.
3. Switching the fuel lines after transfer pumping.
If all transfer pumping between fuel tanks has been performed, it means:
Valve battery switches B and C are still in normal position.
Valve battery switch A is kept in the normal position II right until the next emptying warning.
Feeding tanks are flown empty singly, one by one.
a. After fifth warning of emptying of one of the feeding tanks.
Valve battery switch A is set to position I.
Both engines a re then fed from the left feeding tank.
Right hand side engine fuel pump selector (FB) switch (left on the
instrument panel) is set to position "PI".
Fuel pump selector switch then also closes other feeding line to the right engine. Close monitoring of the fuel content instruments is in such ca se absolutely necessary, (instrument switch in position
3. left instrument, upper readings).
b. When left feeding tank has been used for flying until it only has 5 0 1itres left.
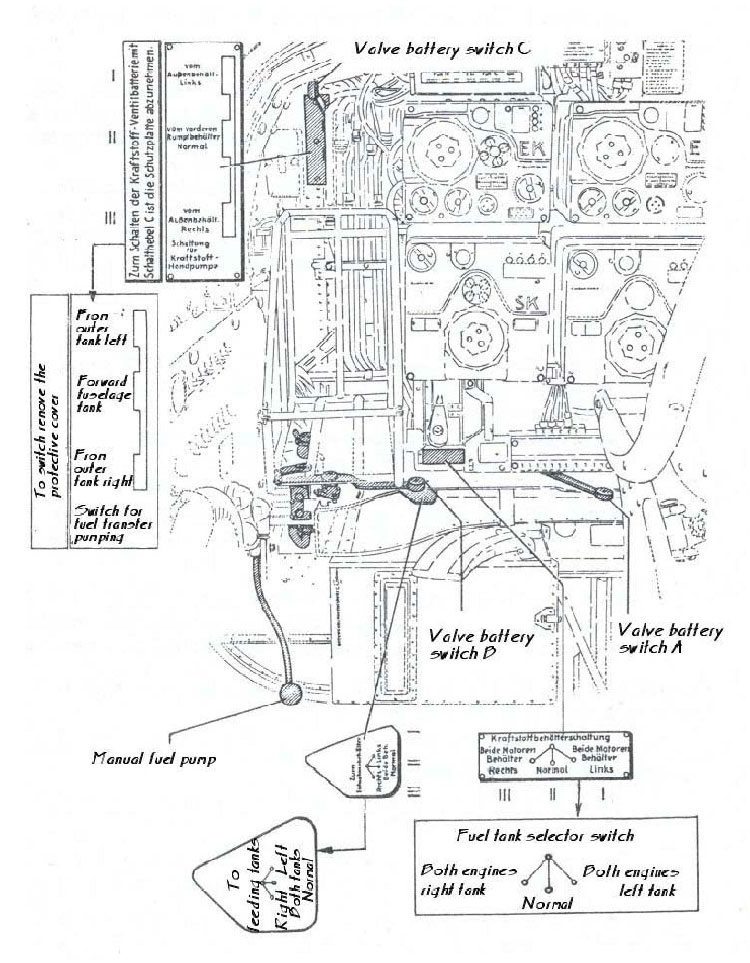
Fig. 4 Locations of valve battery switches A, B and C, and the manual fuel transfer pump lever
c. Valve battery switch A is set to position III.
Both e n g i n e s are then fed from the right feeding tank.
Both engine fuel pump selector (FB) switches are set to position "P1 + P2".
Selector then also closes other feeding line to the right engine. When doing this the left engine is also fed with the remaining 50 liters in the left feeding tank.
To note in point 3a.
Because of the possibility of erroneous indication on the fuel measuring instrument, it is possible that feeding from the left feeding tank is continued for too long time. Therefore it is imperative to follow the running of the engines closely, and at the first sight of engines running unevenly t o turn the valve battery switch A to position III, and continue the flight according to instructions in the point 3b.
The indicator below the pump switch box has , as mentioned before, warning indicators for filling up and emptying for both feeding tanks. Filling up warning (V), when tank has 3501.
Emptying warning (L), when tank has 1001.
When filling up warning turns on, transfer pumps have to be switched off, as otherwise fuel will be lead to tank breathing air pipes and wasted.
2. use in special situations, (transfer pumping with the hand pump)
If the electrical transfer pump is out of action for one reason or other, it is possible to pump manually the fuel from the forward fuselage tank and from the left and ri ght outer fuel tanks to the left or right feeding tanks.
The fuel in the rearward fuselage tank and in jettisonable tanks cannot be pumped manually to the feeding tanks.
The hand pump lever is located on the right fuselage wall down low at the frame 8a.
Manual pumping is performed by the machine gun operator, or by the wireless operator.
Pumping 300 liters manually will take:
at sea level ca. 20 minutes
at 4000m altitude ca. 25 minutes
Filling up signal has to be observed when pumping.
Transfer pumping order
a) both outer wing tanks
b) forward fuselage tank
Switching the tanks (see pictures 4 and 5)
With valve battery switches B and C.
Switch to the tank to pumped in is done with t switch C.
Position I: Left outer wing tank
Position II: Fuselage tank
Position III: Right outer wing tank
Distribution of the pumped fuel to the feeding with the valve battery switch B.
Position I: Left feeding tank, "Left" ("Links").
Position II: Both feeding tanks, "Left and right" ("Links und rechts").
Position III: Right feeding tank, "Right" ("Rechts").
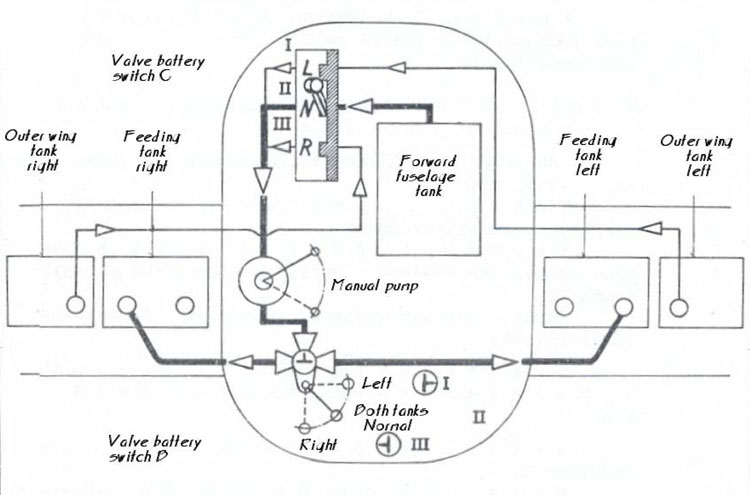
Fig. 5 Fuel transfer pumping system for manual transfer pumping
That means that the pumping can be performed from both outer wing tanks to the feeding tank on the same side or on the opposite side, or to both feeding tanks simultaneously.
This possibility has to be remembered especially for the case when one of the feeding tanks is damaged.
Transfer pumping of engine oil.
Applies only if an auxiliary oil tank is installed in the left wing.
Transfer pumping can only be performed manually.
Manual pumping is performed by the machine gun operator, or by the wireless operator.
The switch of the tank and the hand pumping lever are located between the frames 8 and 8a on the left fuselage wall and above the left flying controls.
Transfer switch is set to the position of the tank to be transferred to.
When the main oil tank contents has been reduced to 30 litres, the transfer pumping is performed by pumping 5 liters at a time to both oil tanks (for achieving even distribution and taking possible single-engine flight in to account).
The instrument below the switch box also gives the filling up warning.
The two switches in the switch box "Feeding pumping" ("Forderpumpen"), "Lubricant left and lubricant right" (Schmierstoff links und Schmierstoff recths") for electrical pumping of oil into the engines are not switched on (switches aren't installed at all to newer switch boxes, see picture 5).
After transfer pumping of oil the transfer pumping switch has to be set to the position that was not used for pumping oil last. This will prevent the oil leaking back to the auxiliary tank.
Cockpit heating
Two pull handles have been installed to the left instrument panel between pilot's and wireless operator's seats.
Fully pulled out = warm air
Middle position =ventilation
Pushed down =apparatus turned off
When frost appears electrical heating of the left windshield panel is switched on.
On the left side of the fuselage beside the instrument panel. Signal lamp must be on (only Ju 88 D-1).
If there is no heating equipment and frosting happens, or when in rain, the left most windshield panel has to be hilly opened and locked to the open position.
6. Flight in conditions where there is a risk of freezing.
Pitot-pipe heating has to be switched on. (switch to left from the pilot) Anti-freezing equipment has to be switched on.
a. Anti-freezing equipment of the elevator.
Operating switch on the instrument panel (frames 5a and 6) is switched to position "On" ("Auf').
b. Anti-freezing equipment of the wing.
Operating switch for right and left wings on the instrument panel (frames 6 and 7) is switched to position "On" ("Auf').
When the outside temperature is below OY the wing heating has to be switched on. The reason for this is the heating for the operating cylinder of the dive-brakes, and for the auxiliary oil tank and to the pipes leading to it.
c. Suction air apparatus (for tropic planes, not installed)
Operating switch can be switched to position "Suction air direct" ("Ansaugluft ungefiltert") only when air speed is less than 260km/h.
d. Anti-freezing equipment of the propellers.
Operating switch on the main panel has to be switched on.
Switch with operating lever is in the right side panel (frame 6).
2 positions: "Full" ("Voll") and "Half' ("Halb").
It has to be noted that the anti-freeze fluid for the propellers will only last for 2 hours. Therefore the anti-freeze equipment has to be only switched on when there duly is a risk of freezing: immediately when the zone, where freezing may occur, has been left behind, equipment must be switched off.
To the points a - b.
Continuous observation is not necessary.
e. Heating panels
Because heating panels do not have thermostats, the following guidelines have to be followed to prevent overheating.
1. While on the ground only short duration (10 sec) switching on is done. Contact surfaces that are not protected with Perspex extensions , are painted with protective lacquer "Garantator" (Ordering number: Flieglack #7151).
2. While the plane is standing still prior to taxiing, the plates are only switched on until the mist clears from the panels (also applies for normal flight).
3. When external freezing happens while flying in clouds or in snowstorm, the heating plate has to be immediately switched on and kept on as long as freezing occurs. After clearing the freezing zone heating has to be switched off.
4. When not in level flight and diving (entering from cold air to warm layer of air), due to excessive coldness of the plane, misting can be expected and the heating can be switched on in advance. After ending such flying th heating must be immediately switched off.
When using the heating plates mentioned above, the use of Nordland-plates is not anymore necessary as the heating plates, when taking the above mentioned in to account, fulfill fully their task.
7. High altitude flight
When performing a high altitude flight at more than 4000m altitude the interior temperature of the cockpit has to be kept above OY
Pressure of oxygen has to be checked. When the pressure is 150ATA, the contents in the fuselage tanks alone will last for 6 operating hours, and the fuselage tanks and wing tanks in the right wing combined will last for 9 operating hours when all the breathing masks are in use.
Oxygen tanks in Ju 88 C-6 will last for 4/1-2 hours.
8. Flight in bad weather
a. Taking off in bad weather
Blind take-off (fog) is not possible with hilly loaded airplane.
Take-off with the use of automatic directional steering is not possible.
Taking off in bad weather requires enough visibility to see the edges of the field and at least 20-3 0m of vertical visibility (obstacles around the field): at night a light must be seen some 4-5km and the cloud base must be at 100-150m. Take-off trim must have been set in flight. Trim is set to cruise when 200m altitude has been reached. Rain protection cover has to be put on the radio equipment. When radio is used the press buttons are opened from the cover in the cable duct, cover is rolled together and put in storage between the fuselage and the radio equipment frame.
b. Blind flight
1. Blind flight at cruise speed
Climbing and descending flight causes no particular problems.
When at over 6000m altitude the elevator controls are comparatively light.
In northerly (N-) direction of flight with the automatic steering there is slight veering, which can be corrected with opposite steering.
Long blind flights are only performed with planes which have operational directional steering.
2. Blind flight while steering from the right hand side seat. Is performed only with directional engaged with rudder.
Main instruments: artificial horizon, the banking indicator ball underneath the gyro-compass. It has to be taken care that the commander does not block the line of sight to the other instruments like variometer or air speed indicator with navigation map. Commander makes the position markings with the help of the direction indicator.
3. Radio direction finding.
Radio direction finding is performed by the commander or the co-pilot of the airplane. In this case the pilot seat is set to it's lowest position. Intercom (EiV-) switch is switched in the switch box ADb 11 (at right on the frame 6) in to position "Nav".
4. Receiving of the wireless operator with radio direction finding equipment. Local weather service.
If the long wave receiver is damaged, or if it is needed to receive local civilian weather reports outside the bandwidth of FuG X, the commander or the co-pilot tunes the radio direction finding equipment (correction diagram has to be used). Wireless operator performs the connection.
c. Landing in bad weather
Because of the fast rate of descent it is necessary to perform drills when the weather and visibility is good. Landing in bad weather is performed with the help of the directional steering. Banking turns have to be performed evenly, or severe veering off the course will happen.
The landing itself must not be performed with the directional steering.
Blind landing is not possible if the fog reaches right down to ground.
Normal values for landing flight:
Manifold pressure 0,9 ATA
Engine RPM 2100 RPM
Indicated airspeed 240-230 km/h
Landing flap angle 25Y(landing flight position)
Undercarriage position down
Flying weigth 11000 kg or less
1. Blind landing based on signals (Ukw-)
a. In landing flight right until the preliminary signal (VE). Minimum altitude 250m
b. From the preliminary signal (VE) right until the main signal (HE).
Manifold pressure 0,7 ATA.
Indicated airspeed 210-200 km/h (at HE)
Indicated descent 4 m / sec
Altitude over HE 50m.
c. From the main signal (HE) right until the landing At HE both throttles are slowly pulled back to idling.
Landing flaps are opened hilly, and at the same time elevators adjust accordingly.
Rate of descent 6 m/sec.
Contact to ground when landing flaps are hilly (501) opened ca. 10 sec, that is 600-700m after hearing the main signal (300-400 m from the edge of the field).
Just prior to touching down the rate of descent has to be reduced by pulling the airplane to higher angle of attack: not to stall landing, then there is risk of dropping a wing.
Landing flaps are set to taking off position (251) only after the airplane has traveled 1000-2000m counting from the hearing of the main signal. When increasing the angle of the landing flaps, and when elevator adjusts accordingly, there will be notable tail heaviness, which is necessary in the final part of the landing flight prior touching down.
2. Blind landing based on signal strength (ZZ)
On the other hand the great rate of descent and long landing roll on the ground, and on the other hand the steep glide path with landing flaps fully opened does not allow for big differences in duration of throttle reduction.
Radio direction alternations, cross-wind based errors, multiplied by the fast approach of the aeroplane, and deceleration from the blending of the engine noise and the "ZZ"-signal prevent the necessary accurate position finding in the final approach.
All landing methods that are based on hearing a signal from the ground are therefore unsuitable for Ju 88 airplane. Only exception are airfields that are longer than 1,5km.[...]
4. Flaring off
Aborting the landing and following taking off again are performed as explained in the paragraph II Dl.
9. Night flying.
Taking off and landing at night time.
1. Length of runway lighting 450m (10 white lanterns) at minimum.
2. The end of the runway is marked with red lanterns which are 50 from the end.
3. On fields where electricity is available, are on dark nights obstacles and the edge of the runway lit on along the distance of the longer side of the field (front and back) and widely (to allow for larger variation of flight paths in take-off and landing).
Before taking off the flash suppressors have to be installed on the exhausts.
Navigation lights.
Instrument lighting.
Landing light (only used during take-off and landing) is switched on by pressing the switch on the left cockpit wall.
Instrument lighting is switched on with a switch on the right cockpit wall.
Adjusting the brightness of the sighting device reticule is done by rotating a knob on the device.
Cockpit is covered: windows with draw curtains.
front dome: lowering a curtain located behind the instrument panel.
10. Taking off with Siemens K4 U directional steering device
Switching on the directional steering device.
The knob of the direction setting rose on the directional gyro is pressed.
Main switch is set to Stage 1 (instrument panel in the front): directional gyro switches.
With the direction setter on the steering column the base of the directional gyro (upper gradient) is matched with the desired direction in the Patin secondary compass.
With the adjusting knob the directional gyro rose(lower gradient) is set to match with the directional gyro base (upper gradient) (pressing the adjusting knob disconnects the steering). Knob is pulled again.
Main switch is set to Stage 2: directional steering is switched on.
When the automatic steering device is switched on the aileron and elevator controls can be handed over to the bombardier to allow the pilot to rest or to perform other functions.
Bombardier then connects the auxiliary steering column (on the right wall) to it's socket (on bombardier's seat low left).
During take-off and landing the auxiliary steering column must be detached from it's socket.
Changing direction
1. Pilot of the airplane
Only with the direction setting switch(in the aileron control fork) the directional gyro base is set to the new, desired flying direction.
Directional setting switch has 3 positions, which make different turning speeds possible:
1. position 1Y sec
2. position 2Y sec (directional steering disengages, smallest radius turn in blind flight)
3. position 2,7Y sec
The banking indicator ball on the directional gyro must then be mainly in the middle (visual checking). Airplane is kept in the right turning position with the use of ailerons.
2. Bombardier (bombing run)
The engaging switch in the direction setting device LRg 5 is switched on.
Warning lamp lights on t h e instrument panel, and shows the pilot that the bombing run performed by the bombardier follows.
ATTENTION: When the signal lamps on the directional gyro are on, the pilot must not use the direction setting switch in the aileron control fork, because it will disengage the LRg 9. Bombardier sets the new position to the directional gyro by using the directional setter in the bomb- aiming device.
When in danger
1. The knob on the directional gyro is pressed or
2. The main switch is turned to far left to position "Off, ("Aus") or
3. The emergency disengaging knob on the left of the bombardiers seat is pulled or
4. By forcefully pressing the rudder pedals the controls are forced to operate in a other way than the directional steering is operating.
If the procedure in the point three is used, the directional steering cannot be switched on during the flight (main switch in position 1).
11. Flying in inclined flight direction
Flight on inclined plane downwards can be performed in following ways:
a. inclined descending flight (up until 201) without pull-out device and without dive- brakes.
b. dive-flight with pull-out device and dive-brakes
c. dive-flight with pull-out device but without dive-brakes
a. inclined descending flight (up until 201) without pull-out device and without dive-brakes.
Supercharger gear lever in position "Automatic" ("Automatik"), high gear will automatically switch off to low gear when reducing throttle to idling.
Propeller governor lever is set to position n = 2200RPM (VS 11-propeller 9-21024 A-3).
If the plane is installed with VS-propeller 9-21024 A-6, the propeller governor lever has to be set to n = 2300RPM.
Propeller governor will maintain the highest permissible RPM.
On VDM -propellers (Ju 88 D-5, D-5 Trop) propeller setting g-15.
Enriching lever in position "Normal".
Radiator flaps hilly closed.
Directional steering disengaged.
Highest permissible speeds:
Va = 675 km/h up until 2km altitude.
Va = 600 km/h above 2km altitude.
Pull-out is performed manually with the help of the elevator trim tabs (especially near the ground level).
b. dive-flight with pull-out device and dive-brakes.
1. Contact altimeter is set to dropping altitude.
2. Switch on the lower side of the main distribution box is set to position "Zielanflug - Kompassstiitzung aus".
3. The aeroplane is trimmed for diving flight. Red line on the elevator trim tab adjusting wheel must be pointing directly up, and the aileron and rudder trim indicators must be set to the red marks
4. Radiator flaps are closed.
5. Propeller governor lever is set to position n = 2300RPM (or 2200 RPM, see above).
6. Supercharger gear lever in position "Automatic" ("Automatik").
7. Enriching lever in position "Normal".
8. Dive brake switch is set to position "Open" ("Auf').
9. Simultaneously when the plane turns in to nose-heavy and to diving position, throttles are pulled to idling.
Greatest permissible speed:
Va = 575 km/h at 0-6km altitude
Attention: Dive is aborted if dive brakes are not opened.
10. Bomb release button is pressed when the signal horn sound in the Intercom device (EiV) ends.
If the bombs are not dropped , the pull-out button on the right cockpit wall has to be pressed instead of the bomb dropping button.
11. If the pull-out device malfunctions for some reason or another, the pull- out can be achieved by forcefully pulling the control column, pressing the the dive- brake switch back to position "Closed" ("Ein") and by using the elevator trim tabs as help (about 1V2 turns).
Addition to the point 3.
Under no circumstances the nose-heavy tendency that is caused by opening the dive brakes must not be trimmed out with the trim tabs, because the airplane will then significantly exceed 3g acceleration in pull-out.
In a dive performed according to the regulations, the force needed on the yoke will be reduced to 0kg as the speed increases.
Addition to the point 8
Airplane thus becomes trimmed nose-heavy, but can still be kept in level flight. Indicator sticks in the wings(lower white mark has to be visible, hydraulic oil pressure must be 85-95ATA) are used to verify that the dive-brakes are fully open.
Addition to the point 9
The inclination of the flight path can be noted in KuVi and with the red dive angle markings in the nose of the airplane. The red dive angle line going around the top of the cockpit (50T) is used to compare the dive angle with the horizon.
There is a multicolored dive angle scale 40Y-70Ygiving the dive angle in the left sliding window panel. There is:
40Ydive angle = red
50Ydive angle = black
60Ydive angle = white
70Ydive angle = brown
c. Dive-flight with pull-out device but without dive-brakes
Allowed only from starting position above 2000m. Points 1-7 are followed as described in paragraph 1 lb.
8. Trim adjustment (behind the dive-brake switch) knob is briefly pressed. Airplane is then trimmed nose-heavy, but can still be kept in level flight easily.
9. Simultaneously when the plane turns in to nose-heavy and to diving position, throttles are pulled to idling.
Greatest permissible speed: Vamax= 500 km/h
Points 10-11 are performed as described in paragraph 1 lb.
d. Height loss during pull-out.
1. inclined descending flight (up until 201) with pull-out acceleration of 2g.
Va = 675 km/h
Va = 600 km/h
height loss h=300m height loss h=300m
2. dive-flight with pull-out device and dive-brakes, with pull-out acceleration of 3g and at Va = 575 km/h.
height loss h=530m at 50Ydive angle
height loss h=700m at 60Ydive angle
height loss h=900m at 70Ydive angle
3. dive-flight with pull-out device but without dive-brakes, with pull-out acceleration of 3g and at Va = 550 km/h .
height loss h=460m at 50Ydive angle
height loss h=650m at 60Ydive angle
height loss h=850m at 70Ydive angle
e. Climb-flight following pull-out
After pull-out dive brakes are closed, and throttle is slowly increased until manifold pressure reaches 1,25 AT A
When under enemy anti-aircraft fire engine rpm can be raised to n=2600RPM, and manifold pressure to 1,4ATA for a short duration.
Propeller governor is set to match the engine RPM to the manifold pressure. Switch on the lower side of the main distribution box is set to position "Marschflug - Kompassstiitzung ein".
12. Flight with photographing equipment
a. Objective heating and warm air heating for the Rb. Both of these have to be switched on.
Every serial photographing setter device is set to "120" or "Stauluft".
b. Heating of the photographing equipment compartment (Karcher-oven)
(This equipment isn't installed on newer aeroplanes which are equipped with electrical heating already in the paragraph a.)
Device can only be switched on when the undercarriage is retracted and the flying altitude is below 3000m.
The switch "Karcher-oven" in the instrument panel is switched on. Heating switch is on the right side of the fuselage, behind the frame 6. Heating observation instrument is on the right side of the fuselage behind the frame 5.
Switching on: Heating switch is set to position "Cold" ("Kalt"). After 30 seconds it is set to position "Warm"("Warm")
Use: Heating observation instrument has to show minimum of 40X If the temperature is lower, the device is switched off. The cause of the problem is to be found and corrected.
Switching off: Is done no later than 5 min before landing. Heating switch is set to "Cold"("Kalt"). After 3 minutes switch is set to position "Off' ("Aus").
c. Operating the photographing equipment.
Serial photographing setter device is set forward from "120" or "Stauluft". By turning the knob further it is possible to set the photographing interval from 90 seconds to 4 seconds.
Serial photographing device's warning lamp will lit ca. 2 sec before shutter opens and will remain lit as long as the shutter remains open. Two other warning lamps are on the right side of the fuselage, below the flare ammunition box. Lamps which show the running of the film in the cameras, will keep flashing as long as the film keeps going on.
The number of photographs taken can be seen on the mechanical counter on the serial photographing device. After photographing has ended serial photographing device and the signal lamps are switched off. The sliding hatch of the photographing aperture is closed.
13. Landing
Maximum permissible 1anding weight: 12000kg
Normal landing weight: 11000kg
IMPORTANT: Landing is only performed without bomb load and wit h external fuel tanks being empty.
Landing with bombs on board can be performed only if when with the take-off weight of 13,75 tones 2150 liters of fuel has been used or jettisoned.
Landing with start rockets is not possible because then the maximum landing weight would be exceeded.
Emergency jettison.
In emergency bombs are dropped to specially chosen areas (closed area) secured.
Emergency jettisoning of fuel (only possible from the fuselage tanks) is performed as follows:
The switch "Emergency jettison" ("Schnellablass") is on the switch box (left cockpit wall) can be accessed by opening a securing lid.
The forward fuselage tank is emptied first then the rearward fuselage tank.
(emptying of both fuselage tanks simultaneously is forbidden, because this prevents emptying of the other tank , when the other one is already empty.)
Lever is set to position "On" ("Ein").
Time for emptying when n=2250RPM
a) for full forward fuselage tank (1200 1) = 1 min 40 sec.
b) For full rearward fuselage tank (680 1) = ca. 1 min.
Jettisoning can be aborted by turning the lever to position "Off' ("Aus"). The smallest amount of fuel.
When running out of fuel one of the feeding tanks can be flown to empty state, when only the other one has 551 as the smallest necessary amount of fuel, for the possibility of having to abort the landing and flare off again.
Valve battery switch A to position 1, right engine fuel pump selector (FB) to position "PI" when:
When the smallest amount of fuel is in the right feeding tank.
Electrical transfer pump has to be switched to the according feeding pump (for possible flaring off).
Auxiliary steering column is disconnected from it's socket if it was used. Machine gun operator sits on his folding seat facing forward (laying in the gondola is forbidden).
Wireless operator's seat is in the lowest position. Seat belts are fastened.
Directional steering main switch is set to stage 1.
Supercharger lever is in the position "Automatic" ("Automatik").
Enriching 1ever is set to the position "Normal".
At sufficient altitude airspeed is reduced to the value Va = 260 km/h. Radiator flaps are fully open.
Lever for air filtering to position "Suction through the filter" ("Ansaugluft Gefiltert"). Landing flaps are first set to position 25Y(middle position).
Operating lever is turned in direction "Open" ("Aus") to position "Landing flaps" ("Landeklappe").
When the landing flaps are in the angle of 25Y, the operating lever is again returned to 0-position.
After this speed must not exceed Va = 255 km/h, because otherwise the landing flap securing will be opened and the flaps have to be re-opened.
The changes in the aeroplanes balance are corrected with manually adjusting the elevators trim tabs (large hand wheel on the left cockpit wall).
The landing field is circulated in normal turning flight at ca. Va = 220 km/h. Speed. The undercarriage is lowered. Operating lever is set to position "Down" ("Aus").
When the indicator device shows that the undercarriage and the tail wheel are fully lowered and locked, one must wait for t sec until the undercarriage bay doors are closed again. The overall time that this operation takes is ca. 25-28 sec. The undercarriage operating lever is returned to 0-position.
Approx. 1-2 km before the airfield edge the landing flaps (and the elevator) are set to full angle (501)
Operating lever is turned in direction "Open" ("Aus") to position "Elevator and landing flaps" ("Hohenflosse und Landeklappe").
When landing flaps are in position the operating lever is returned to 0-position(otherwise automatic securing of the flaps will not function).
The entering oil temperature must not be below 40Y
Landing speed : Va = 210 - 220 km/h.
Just prior to touching down throttle is slowly reduced to the idling stops and the aeroplane is pulled to 3-point landing attitude.
In strong winds and in gusty weather landing must be performed accurately towards the wind and with fully opened landing flaps at speed of Va = 220 km/h. Speed when aeroplane touches the ground is, when landing weight is 11500kg,
Va = 160 km/h. Simultaneously pilot pulls hard to straighten the plane.
Landing run distances in windless conditions when brakes are used:
When weight is 11500kg = 500-700m from touching down until the aeroplane has stopped.
When weight is 11500kg = 700-900m from over a 20m high obstacle until the aeroplane has stopped.
Brakes are used only if it is absolutely necessary.
If the landing is a training landing or if brakes were heavily used, a break of few minutes must be taken to cool down the wheel brakes, before they are used again (while taxiing). Landing flaps are pulled to cruising position while taxiing.
When landing flaps are fully closed , the operating lever is set to 0-position. Only after this it is possible to perform turning while taxiing. Exiting from the aeroplane.
When opening the C-position for exiting from the aeroplane, the hatch is carefully lowered with the use of rope, not let to freely fall open.
14. Stopping the engines
Radiator flaps are fully open.
Already in landing pattern the radiator flaps have to be fully opened to achieve lower cooling fluid temperature and so that the flawless turning off the engines would be possible. If the cooling fluid temperature is very high, the engines have to be run at ca. 1200 - 1400 rpm speed with low manifold pressure (ca 0,7ATA), until the engine cools down. During this the plane must be facing the wind.
Engines are stopped when the temperature reaches 115KC. Throttle is left ca. 1200RPM setting.
Enriching 1 e v e r is set to the position "Normal".
Main fuel cock is closed (simultaneously instant stopping mechanism in the fuel injection pumps is actuated). Ignition is switched off.
If the engine backfires or rotates backwards, the throttle is set to full and propellor is feathered. N ever switch on the ingnition again. Before the engine stops close the radiator flaps.
When the engine has stopped, push the network switch (instrument panel low left) and leave the throttle to idling position. Main fuel cock is opened for a short time (1-2 min) to easen up to engine start with cold engine.
Switch in the left cockpit wall and the radio equipment are switched off, all the switches in the switch board are left switched on.
For cold start preparations before stopping the engines see part III.
D. OPERATION IN EMERGENCY
1. Flaring off
Flaring off before landing has been fully completed, with fully lowered landing flaps and undercarriage, is possible. Even so when doing this an unpleasant phenomena of very strong tail heaviness appears.
The RPM selector switch is kept in the position n=2250RPM or in Ju 88 D-5 and Ju 88 D-5 Trop. Propellor pitch is kep in the position 1150.
Throttle is slowly applied to full when reaching the speed of Va = 220 km/h. The RPM selector switch can be pushed along. Landing flaps are not closed.
Landing flap operating lever is kept in the position 0.
Due to increased air pressure the landing flaps return to lower angle automatically, when speed has increased over Va = 255 km/h (landing flap securing), and so they must be re-opened when trying to land again.
Landing flaps are thus retracted only after reaching 200m altitude, if they have not retracted themselves already earlier.
Flaring off is made more difficult due to the lag in the indication of instruments, especially with altimeter and variometer. Main instrument along the turn and bank indicator is thus air speed indicator.
All other function as in normal take-off.
Attention: Flaring off with lowered undercarriage in single engine flight is not possible.
2. Pull-out mechanism is inoperational
If pull-out mechanism is inoperational, the pull-out can be performed by using the elevator t rim tabs (Approx. for 11/2 turns on the wheel to direction "Tail heavy" ("Schwanzlastig"), after which flight is continued and landing performed.
When dive brakes are open, the dive brake switch is set to position "Closed" ("Ein").
3. Hydraulic oil system is out of order
Switching diagrams for both hydraulic oil emergency switches are kept next to the switches. Undercarriage lever (in the left panel) is kept at the 0-position, while landing flap operating lever is turned in direction "Open" ("Aus") to position "Landing flaps" ("Landeklappe"). The dive brake switch is set to position "Closed" ("Ein").
1. Operating the undercarriage bay door emergency switch
First the undercarriage bay doors are opened, and second the undercarriage is lowered._ Right hand side hydraulic oil emergency switch is switched to position 1 "Undercarriage bay doors emergency" ("Fahrgestellklappe - Not"), manual pump operating lever (low left on the observers seat) is set in place in the pump and with the pump the doors are opened until the operating pressure starts to grow much. Undercarriage bay doors are thus opened.
There is no dedicated indicator, but the bay doors can be seen from the cockpit. The undercarriage indicator does not show locked anymore when the bay doors are opened even slightly.
2. Operating the undercarriage emergency switch
Lowering the undercarriage at speeds over Va = 265 km/h is prohibited. The speed has to be reduced to Va = 200 km/h if possible to reduce the forces that need to be overcome by the pumping action.
Lowering of the undercarriage with the emergency operation takes ca. 3 min which equals to 180- 200 double pump strokes.
To prevent accidental switching on of the emergency system prior opening the undercarriage bay doors to position "Undercarriage" ("Fahrgestell"), is the righthand hydraulic emergency switch equipped with a safety (press button) between positions 2 and 3. Right hand side hydraulic emergency switch is set to position 2 "Undercarriage - emergency"("Fahrgestell - Not"), while simultaneously pressing the safety, and then pumping down the undercarriage with the manual pump, until the indicator shows "Undercarriage down" ("Fahrgestell ausgefahren) and "Locked"("Verriegelt").
Right hand side hydraulic emergency switch is returned to position 3, and the undercarriage operating lever to position 0.
During switching over the pumping has to be paused. Pumping is only continued only when continuing with the action described in point 3. Undercarriage bay doors are left open.
When using the emergency hydraulic switches the tail wheel remains retracted inside the fuselage. Landing has to be then used using the auxiliary tail spur. Taxiing with the auxiliary tail spur is prohibited.
3. Operating the landing flap emergency switch
Lowering time for the landing flaps using the emergency hydraulic switches - 30-35 seconds, equalling to 30-35 double strokes on the manual pump.
Left emergency hydraulic switch is set to position 4 "Landing flaps - emergency" ("Landeklappe - Not").
Landing flaps are opened with the hand pump.
For landing flap angles the following speed restrictions have to be noted:
Take-off position (251) Take-off position (501)
Va max = 250-320 km/h Va max = 255-275 km/h
When the use of emergency hydraulic switch is finished, the emergency hydraulic switch has to be set to position 6. When using the emergency hydraulic switch the elevator will not function along with the flaps.
4. Operating the dive brake emergency switch Only retracting the dive brakes is possible.
Retracting time is ca. 36-40 seconds equalling to 36-40 dual strokes on the hand pump. Left emergency hydraulic switch is set to position 5 "Dive brakes - emergency" ("Sturzflugbremseklappen - Not"). Dive brakes are fully retracted with the hand pump.
After finishing the use of emergency system, the hydraulic oil emergency switch is returned to position 6. When using the emergency hydraulic switch the elevator will not function and return to original position. It must be corrected with the trim wheel.
If the limiter switch belonging to electrical equipment does not function the pressure will remain the device. In such case the switch "RAB - Pull-out device" ("RAB Abfang-Vorrictung") must be disconnected to spare the pump.
When engines are off or when the engine pumps are damaged, must all devices be operated with the emergency system. Only when the emergency system is damaged it is allowed to use hand pumping for all functions with by-passing both hydraulic emergency switches 5 and 6, not counting in the "Undercarriage up"("Fahrwerk einfahren") operation, as it would require too much manual strength.
When propeller automatic malfunctions, it is basically required to switch off the propeller automatic operation by disconnecting the corresponding switch "VS automatic left engine" ("VS Automatik links Antrieb") or "VS automatic right engine" ("VS Automatik rechts Antrieb") in the switch board.
4. Malfunctions in the propeller automatic
When propeller automatic malfunctions, it is basically required to switch off the propeller automatic operation by disconnecting the corresponding switch "VS automatic left engine" or "VS automatic right engine" in the switch board.
5. Engine trouble
In order to avoid difficult single engine landings, the engine in question is stopped so quickly in case of a malfunction, that it can be started again for short time for landing. During the landing damaged engine is used with as low power setting as possible.
Throttle is pulled back to idling.
Main fuel cock is closed.
Ignition is immediately switched off.
VS 11 propeller's manual selector is pressed to position "Feathered"("Segelstellung") long enough (ca. 10 sec), until the feathered state has been reached.
VDM propeller's manual selector is pressed to position "Feathered"("Segelstellung") where it is locked. The feathering time is ca. 40 sec, with propeller pitch indicator showing 225 = 87X After reaching the feathered position the switch is released. Radiator flaps are closed.
Fuel pumps for both feeding tanks are immediately switched to operating engine ( switch box on the left cockpit wall).
If the engine failure happens during take-off or immediately after taking off, the switch to single engine flight is not possible, even if the flying weight is such that the normal single engine level flight would be possible.
In such case note the paragraph "Forced landing".
If there is a fire in the engine compartment the cockpit heating and de-icing lever for the wing in question is switched "Off' ("Zu").
6. Single engine flight
1) Flying weight is reduced to suitable weight (10500kg, maximum of 11000kg) required for single engine level flight. To be performed:
a. Emergency bomb jettison.
b. Partial emptying of fuselage tank with fuel jettison device (also see II C. 13) (Trailing antenna must be winched in prior fuel jettison, otherwise risk of fire!)
c. Jettisoning of the wing bomb racks at less than Va = 250 km/h speed.
d. Jettisoning of armor plates and all unnecessary equipment from the plane; the jettisonable part of C-position is not released as that would damage the aerodynamics of the plane.
c. and d. Or performed only in such case that the aeroplane cannot maintain level flight after performing points a, b and c.
Addition to point c.: two sealed switches in the middle above from the instrument panel. Switch in the switch board "Wing racks jettison" ("Lastentrager - Absprengung") must be switched on.
Operating switches are not turned simultaneously, but one after another.
Addition to point d.: Four collapsible armour plates for the radio equipment and other armour plates are detached as follows:
Locking handle is turned around, and the latch mechanisms on the armour plate sides are opened.
Hinge bolts are pressed upwards. The locks in them are set parallel to the hinge bolt axis. Armour plates are held fast. Hinge bolts are pulled off.
Armour plates are dropped from the open C-position hatch (hatch to be closed after jettison).
2) If possible do not reduce speed under Va = 250 km/h. Altitude can not be held by loosing airspeed.
If speed cannot be maintained for example due gusts, aeroplane can be put into a shallow dive.
3) Landing flaps in cruise position OX
4) Undercarriage retracted.
5) On the running engine:
Manifold pressure p = 1,25 ATA
RPM n = 2400RPM (30 min climb and combat power)
RPM selection lever is is set to the corresponding engine RPM.
6) Cooling fluid temperature and engine oil temperature are closely followed. If the highest permissable values are exceeded, power has to be reduced.
7) Weight of the rudder is reduced with the trim tabs.
8) Automatic direction steering is switched on in a following way:
a. Direction gyro button is pressed.
b. Aeroplane is let to hang on the side of the operating engine for one ball width in the turn and bank indicator (directional gyro).
c. In front of the instrument panel on the right, the switch for single engine flight is turned to the side of the not operating engine (Va less than 270 km/h.).
d. The rose (directional gyro's lower reading) is set parallel with the desired course.
e. Direction gyro button is pulled.
f. Direction is changed until the width of the bubble evens out.
g. Beginning of the turn is with out question helped with ailerons.
9) Because only one generator is operating, the battery is heavily strained, when radio equipment and direction steering are simultaneously used. Therefore the transformer for FuG 10 transmitter set is switched on only when necessary. BZA-device is disconnected.
10) Fuel is first fed from the tanks on the side of the stopped engine.
Valve battery switch is simultaneously turned to the side of the stopped engine and locked. The fuel pump selector (FB) switch of the operating engine is in the position "PI". The fuel on the fuel cells on the side of the operating engine is cut out, and the fuel on the cells on the side of the stopped engine is connected into use.
Banking in single engine flight.
Banking turn, especially on the side of stopped engine, has to be performed without slipping and with overspeed.
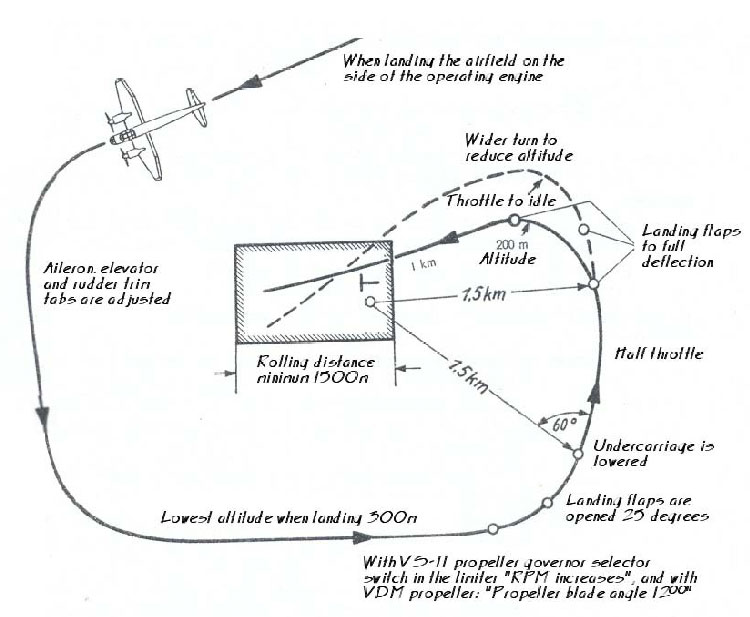
Fig. 6 Performing a single engine landing
7. Forced landing.
a. Landing from single engine flight (see picture 6)
1) Flying weight has to be reduced as much as possible (see. 6." Single engine flight", point 1.)
2) Airfield is to be kept on the side of the operating engine, and the landing site is circulated in banking turn.
3) While doing this altitude must not be lower than 300m counting from the airfield, preferably not lower than 500m.
4) The RPM selection lever is set to position n = 2250RPM.
5) Landing flaps are set to 25Yangle. (take-off position).
6) Undercarriage is immediately lowered , when the landing signal cross on the near edge of the field can be seen in 60Yangle relative to the flight path.
7) Landing flaps are opened to full angle (501) on if, landing has been started from too high altitude, otherwise landing is possible also when the landing flaps are in the take-off position (251) (shallow glide path).
Attention: Undercarriage lowering times: With engine 40 sec.
Manually 3 min; 180-200 pump strokes.
Landing flap opening times: With engine 15 sec.
Manually 30 sec; 30-35 pump strokes.
8) While lowering the undercarriage and opening the landing flaps the aeroplane is turned towards the airfield (in calm weather extending the flight path, in windy weather staying near the field), landing is started at 200m altitude and with little throttle by steering the aeroplane in to correct glide path.
Glide path with lowered undercarriage and landing flaps fully opened is, when engines are idling, very steep (1:8). Therefore landings flaps are opened fully only if fast loss of altitude is required.
Banking turns and glide path at speed Va = 210 - 220 km/h.
9) During the last part of airfield approach the rudder trim tabs are set to half and and aileron trim tabs at 0, because pressure on the controls is to counter whilst landing.
Only very shortly before touching down the throttle is pulled to idle position. By doing this the strong braking effect of the propellers is avoided.
10) If touching down appears to be happening too early, landing glide can be extended with the help of the engine.
Throttle is increased very slowly and only as much as to ju st barely keep the aeroplane in the air.
In an emergency it is better to touch down even at too high speed when the glide slope remains normal, than to add excessively add thrust to only one engine and thus cause a flip over one wing.
11) Landing on the fuselage (undercarriage retracted) has to be always performed:
If for a reason or another (low cloud base) it is impossible to reach minimum necessary altitude of 300m prior to single engine landing.
If there is no suitable place for performing a normal landing.
Landing on the fuselage is not as dangerous to the crew as nosing over, which can happen in normal landing, when conditions for landing are not satisfactory. Landing on the fuselage is started as a normal landing.
These points must be noted:
a) C-gunner position has to be ejected prior to landing if there is a risk of nosing over.
b) Undercarriage is not lowered, not even partially.
c) Landing flaps are set to fully open angle (50Y).
d) When aeroplane touches down, propellers should preferably be standing still (feathered). Canopy ejection mechanism is disengaged but canopy is not released.
e) Fly only very slightly above ground, and then aeroplane is pulled slowly and evenly in such manner that it touches the ground with it's auxiliary spur first (glider landing is performed).
f) Everything is tightly tied on their places. Head is turned to right, away from the Revi sight.
g) Machine gun operator is sitting on his seat, ventral gondola is normally torn away in the landing.
h) Wireless operator has to note following things:
Armour plating has to be tightly locked in place. ) If not jettisoned
Weapons must be tied with their belts. ) during the flight.
Wireless operator's seat must be in the lowest position.
During the glide in to the landing wireless operator detaches the microphone from his operator's head piece. Radio contact will still remain open. If wireless operator wishes to speak, all he has to do is to press the microphone against his throat.
After this wireless operator grabs his seat belt tightly in order to avoid injury in the case of nosing over.
Flaring off from single engine landing.
Flaring off from single engine landing (i.e. aborting the landing in it final phase), when only one engine is running, is i m p o s s i b 1 e , if the undercarriage is lowered or the landing flaps are fully opened.
c. Forced landing when both engines have stopped.
The main fuel cock is closed. Ignition is switched off.
If possible propellers are set to position "Feathered" ("Segelstellung"). Before landing Verey pistol flares are jettisoned. C-gunner position is jettisoned.
Right before touching down the canopy jettisoning system is opened.
d. Landing into water
Before hitting the water crew must:
1) Jettison the canopy.
2) Open parachute harnesses.
3) Retract undercarriage, stop the engines.
4) Open landing flaps to full angle and
5) When the wind is strong and waves large perform a normal landing towards the wind.
6) When the wind is weak or in calm weather when waves are large land in the direction of the waves on their crest.
7) In rough seas and strong winds jumping on a parachute must be considered better alternative than landing on the water, because in rough seas aeroplane will sink to the bottom immediately and thus getting out of it is questionable.
8) Landing on the water is performed tail first.
9) Immediately before the aeroplane touches the water wireless operator operates the dinghy release lever (at frame 8a).
1. Release step (15mm stroke) "Hatches released" ("Klappen frei")
2. Release step (140mm stroke) "Dinghy released" ("Boot frei")
Dinghy is then filled with carbon dioxide and it emerges from it's locker. Dinghy is ready for use.
10) After the aeroplane has contacted the water:
Seatbelts are opened, crew exits the aeroplane. Bottle valves of the life jackets are opened. (Pressure air bottles must not be opened under no circumstances before opening the seatbelts nor when in the aeroplane under no circumstances, because that may present the danger of not getting out of the plane.)
The dinghy is pulled near with the pull chord outside the fuselage. The three piece oars are made operational, and attached to the oarlocks. The dinghy is boarded and following procedures performed:
1) Pull chord is detached. It is most reasonable to pull it in to the dinghy.
2) The knot on the hand rope/rescue rope is untied and dinghy pushed clear from the aeroplane.
3) When the hand rope is packed tightly, another knot/hand rope is opened (on newer dinghies there is no hand rope, but "weak point" for breaking.)
For emergency radio transmitter operation, see: "Ju 88 aeroplane radio equipment - Shrt manual for wireless operators and crew" (" Ju 88 Flugzeug-Bordfunkanlage - Kurzbetriensanweisung fur Bordfunker und Besatsung").
e. Landing into water with parachute
1) In calm weather and light wind the parachute harness is opened when slightly over the surface (ca. l-2m), making sure not to be covered with the parachute and getting trapped with in the ropes.
2) In strong wind close to shoreline or rescue vessel the harness is not opened before the parachute has dropped in to the water to maximise the sail effect.
3) Only after opening the parachute harness the bottle valve of the life vest is opened.
4) If rescue aeroplane comes in to sight while floating in the water, a dye bag is set in to the water by opening it's mouth and removing it's rubber cover. Bag will empty itself in 10 minutes and the splash of color will remain ca. 1V2 hours.
8. Emergency equipment of the aeroplane
a. Tropical emergency gear.
b. Winter emergency equipment
Equipment has been placed in box-sleigh with detachable skis, installed in the dinghy locker. When taking the emergency equipment from the aeroplane the skis stored inside the box have to be attached to the ski fastening irons in the bottom of the box. A wooden dowels belonging the attachment points has to be stricken in the hole reserved for it. For preventing accidental detachment of the dowels and resulting detachment of the skis, each dowel is equipped with a locking loop which is put in to longitudal groove reserved for it after striking in the dowels, and screwed in to the ski.
9. Jumping with the parachute.
Parachute jump is only performed on the order of the pilot of the aeroplane. There are two alternative exit routes:
1) Through the ventral hatch,
2) Through the ejected canopy.
If possible jump is done through the ventral hatch, because when exiting from the ejected canopy it possible that the jumper be injured by the tail assembly.
To point 1. Jettisoning the C-gunner position. Trailing antenna in pulled in or cut.
First the latch on the attachment rope is detached from the static ventral gondola. Safety on the red lever on the bottom of the gondola is removed and lever is turned. Lower part of C-gunner position falls off.
To point 2. Jettisoning of the canopy.
First the armor plates are removed.
All crew members must be fastened with seat belts.
Safety on a hand lever high behind the frame 6 is removed by the wireless operator or the observer, and he also pushes around with open grip, without holding the lever in hand. The rear part of the canopy is detached and the air stream wrenches it clear from the aeroplane.
10. Wilful destruction of the aeroplane.
If the aeroplane has to be landed in enemy territory, without any chance of rescue, the aeroplane has to be destroyed. See part 9A "General equipment, booklet 5, "Self destruction device".